1 Mediatek Video SDK
1.1 Introduction
The Mediatek Video SDK is a powerful tool designed to help application developers fully utilize the potential of MTK hardware encoders. With the diverse range of video encoding applications, different scenarios have varying requirements. To meet these diverse needs, Mediatek has developed this Video SDK, allowing developers to fine-tune the encoder for different use cases and achieve the best possible video encoding results.
For example, in live streaming applications, maintaining high video quality and controlling bitrate are crucial, while in video conference scenarios, low latency and stable bitrate are the priorities. The SDK provides the flexibility to adjust settings to meet these specific needs.
1.2 Architecture
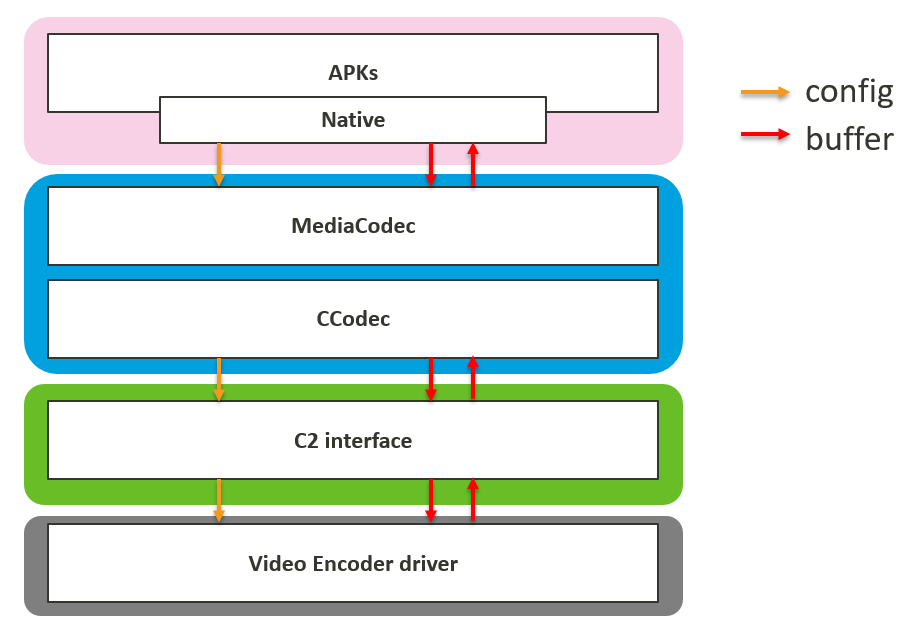
Applications are required to use the vendor extension APIs provided in this document through the native C/C++ MediaCodec interface. MediaCodec is a part of the Android framework that provides access to low-level media codecs, enabling developers to encode and decode video and audio streams. We assume that application developers have a certain level of understanding of the native MediaCodec.
You may refer to the following simplified data flow diagram for a quick overview of MediaCodec. The usage of vendor extension APIs is facilitated through MediaCodec's configuration, mainly via the configure and setParameters methods provided by the standard MediaCodec interface.
1.3 Purpose of This Document
The main purpose of this document is to assist users in gaining a deeper understanding of the Mediatek Video SDK and how to use it effectively. This document will outline the various vendor extension APIs and offer guidance on how to effectively utilize them for the best possible video encoding results. By integrating MTK's video encoder with these extension APIs, developers can achieve precise control over video quality, ensuring a superior end-user experience.
In the following sections, we will cover:
- Detailed descriptions of the vendor extension APIs
- Examples of how to configure and use these APIs in different scenarios
- Best practices for achieving optimal video encoding result
1.4 SDK Evolution
The Mediatek Video SDK provides flexible settings for Mediatek hardware encoders to achieve optimal encoding results. The SDK is divided into two versions: 1.0 and 2.0. Version 1.0 is already supported on some current market devices, while version 2.0 will debut in the next generation of projects.
Version 1.0
Version 1.0, known as Professional Mode, focuses on function control. This mode allows users to adjust various functional parameters of the hardware encoder to meet their specific needs. However, the numerous adjustable parameters and diverse tuning directions often require app developers to go through a tedious process of trial and error to find the desired tuning direction and achieve satisfactory results. This complexity can be a significant pain point for developers who need to fine-tune the encoder settings extensively.
Version 2.0
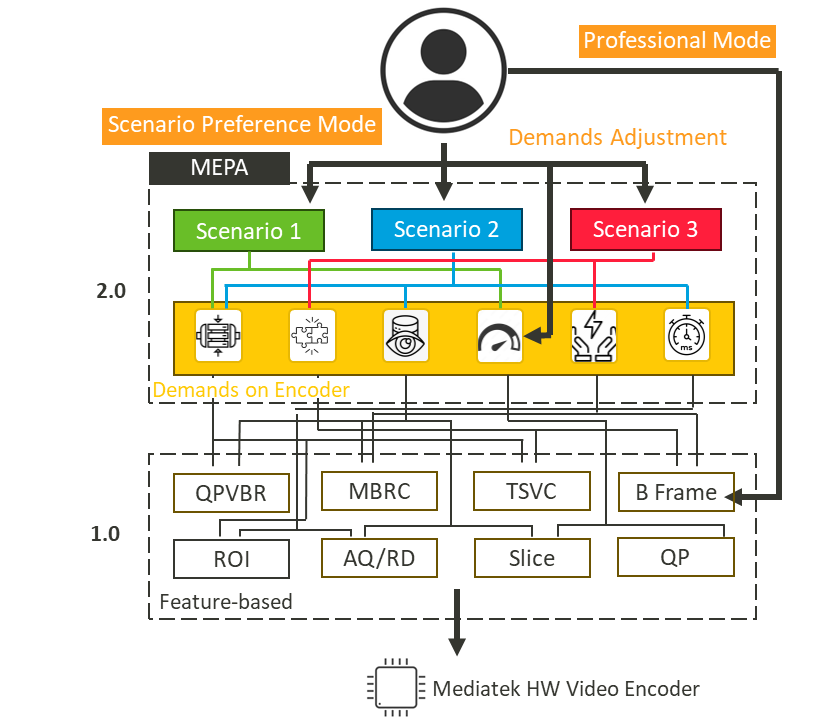
To address the challenges of version 1.0, Mediatek introduced version 2.0, known as Scenario Preference Mode. This version packages the complex parameters into scenario-based settings, providing Mediatek-defined optimal parameters for each scenario. This approach simplifies the setup process, allowing users to quickly configure the encoder with a single click based on the corresponding scenario.
Version 2.0 is designed to be compatible with version 1.0, meaning that it includes all the functionalities of 1.0. After selecting a specific scenario through Scenario Preference Mode, users can still make further custom adjustments using Professional Mode. For example, if the scenario setting in Scenario Preference Mode sets the global min/max QP to 5 and 47, but the app developer sets the global min/max QP to 0 and 51 through Professional Mode, the actual setting will follow the Professional Mode, i.e., the global min/max QP will be 0 and 51.
Below is an architecture diagram illustrating the concepts of versions 1.0 and 2.0:
1.5 SDK Coverage Plan and Supported Hardware Projects
The Mediatek Video SDK is designed to support a wide range of hardware projects, ensuring that developers can leverage the full capabilities of Mediatek hardware encoders across different devices. This section outlines the coverage plan for SDK versions 1.0 and 2.0, as well as the support for various hardware projects.
1.5.1 Version Support
The support for SDK versions 1.0 and 2.0 varies depending on the hardware platform. Detailed information on the supported hardware will be provided in a subsequent list. However, it is important to note the following key points regarding SDK version support:
- SDK 1.0 and 2.0 Support
The degree of support for SDK versions 1.0 and 2.0 can be referenced in section 2.3.1 of this document. This section provides a comprehensive overview of the compatibility and support levels for different hardware platforms.
- Scenario Preference Mode Limitation
Due to Android policy restrictions, the Scenario Preference Mode introduced in SDK 2.0 cannot be backward compatible with older platforms. This means that devices running on older hardware will not be able to utilize the Scenario Preference Mode directly. The specific Android policy restrictions include limitations on API access and hardware capabilities that are not present in older devices.
- Recommended Settings for SDK 1.0
To help app developers achieve encoding results similar to those provided by the Scenario Preference Mode in SDK 2.0, this document will offer recommended parameter settings. These settings can be applied using SDK 1.0 to approximate the performance and quality enhancements of SDK 2.0. You can refer to the later sections for recommended settings.
1.5.2 Future Platform Support
All future platforms will support the Scenario Preference Mode in SDK 2.0. However, it is important to recognize that platform capabilities may vary. For example, flagship platforms may see a 10% improvement in encoding efficiency when using the Live Streaming scenario, while mid-range and entry-level platforms will also experience efficiency gains, albeit potentially less than 10%.
- Example of Platform Efficiency
|
Flagship Platform |
Enabling the Live Streaming scenario may result in a 10% improvement in encoding efficiency. |
|
Mid-range Platform |
The same scenario may yield a slightly lower efficiency improvement compared to flagship platforms, but still provides noticeable benefits. |
By understanding these variations, developers can better optimize their applications for different hardware capabilities, ensuring the best possible performance and quality across a range of devices.
2 SDK Overview
The Mediatek Video SDK is primarily based on the MediaCodec vendor extension API, which is divided into two types: static and dynamic. These APIs allow developers to fine-tune the encoding process to achieve optimal video quality and performance. Below is an introduction to both types of APIs.
- Static API
Static Configure APIs are utilized during the initialization of the video encoder, and once set, these configurations are consistently applied throughout the entire encoded video sequence. This approach is ideal for situations where the encoding settings remain unchanged, avoiding unnecessary overhead and providing a stable video quality.
- Dynamic API
Dynamic APIs offer the ability to adapt and modify encoding settings during the encoding process. This level of flexibility allows users to react to changing requirements or conditions, such as varying video content complexity, network congestion, or user experience feedback. This real-time adaptability ensures optimal video quality without being constrained by fixed configurations.
2.1 SDK 1.0 List
The SDK 1.0 focuses on controlling specific functions or parameters of the Mediatek hardware encoder, which in turn affects the final encoding results in terms of video quality, bitrate, or performance. Below is a detailed list of the APIs, their descriptions, and types (static or dynamic).
|
Parameter Name |
Description |
Type |
|
Min/Max QP |
Control the range of QP values during video encoding to balance visual quality and bitrate efficiency, with global settings providing hard constraints and frame-level settings offering more precise control. |
|
|
QPVBR |
Allows for dynamic bitrate adjustments during video encoding to balance between quality and bitrate efficiency. |
Static |
|
Chroma QP Offset |
Adjusts the quantization parameters for color information in video encoding to improve chroma quality and reduce color artifacts. |
Static |
|
QP Frame Limiter |
Controls the range of QP adjustments during video encoding to balance consistent visual quality and precise bitrate management. |
|
|
Initial Frame QP |
Sets the starting QP value for the rate control system to ensure efficient encoding and stable visual quality from the first frame. |
Dynamic |
|
Adjusts the sensitivity of per-macroblock QP tracking to improve bitrate control accuracy, potentially affecting visual quality. |
Static |
|
|
Optimize QP values and bit allocation to balance visual quality between flat and complex regions in encoded video. |
Static |
|
|
Encode Mode |
Adjusts power consumption, performance, and visual quality to meet the specific needs of different scenarios. |
Static |
|
I-Frame Smoothing |
Limits the size of I-frames to ensure consistent and stable bitrate. |
Dynamic |
|
B-Frame |
B-Frame Compatibility Settings enhance video stream compatibility with various decoding devices |
Dynamic |
By utilizing these APIs, developers can fine-tune the encoding process to meet their specific needs, ensuring optimal video quality and performance for their applications.
3 SDK 1.0 Detailed Parameter Definitions and Configuration
3.1 QPVBR
QP-driven Variable Bitrate (QPVBR) mode is a feature that allows for fine-tuning of bitrate adjustments in encoding applications. QPVBR is divided into two parts: overshooting and undershooting.
By overshooting the target bitrate, QPVBR mode adjusts to allocate more bits during encoding, ultimately resulting in higher encoding quality. Conversely, undershooting focuses on saving bits when appropriate, without necessarily pushing for higher quality. This approach helps in reducing the overall bitrate by allocating fewer bits during encoding when the quality requirements are not as stringent.
The following is the old API. The old platform only supports the overshooting part of QPVBR. For details on API support, please refer to Chapter 5.
3.1.1 Detailed Explanation
Switch: Determines whether the feature is enabled or disabled.
Threshold: The QP value that triggers the start of overshooting or undershooting.
Ratio: The extent to which the bitrate is adjusted (either increased or decreased).
QPVBR settings primarily focus on the threshold and ratio. When the QP exceeds the set threshold, overshooting or undershooting is triggered according to the specified ratio. For example, setting an overshooting threshold of 40 and a ratio of 120 means that during the encoding process, if the QP rises above 40 due to the complexity of the video content (indicating a drop in quality), overshooting will be triggered. A ratio of 120 means that the bitrate can exceed the target by up to 20%, allowing the quality (QP) to be maintained.
- Practical Application
QPVBR represents a trade-off between quality and bitrate. In scenarios where high visual quality is paramount, such as camera recording, the bitrate does not need to be precisely controlled. In these cases, enabling overshooting can improve quality by allowing the bitrate to exceed the target. Conversely, in scenarios where minimizing bitrate is crucial, such as streaming over limited bandwidth, undershoot -ing can be used to save bits at the expense of some quality.
When configuring video encoding settings, developers can also consider using QPVBR to balance the trade-off between quality and bitrate. For instance, in high-quality recording scenarios, allowing bitrate overshooting can enhance visual quality, while in bandwidth-constrained streaming scenarios, bitrate undershooting can help conserve bandwidth.
3.1.2 Example Configuration
Below is a code snippet that demonstrates how to enable QPVBR mode and configure it to trigger QPVBR setting.
- The following example sets QP 40 as the threshold to trigger QPVBR overshooting, with a maximum overshoot not exceeding 35% of the target bitrate. (If undershoot-ing is not set, the driver preset will be used)
MediaFormat format = MediaFormat.createVideoFormat(mMimeType, mWidth, mHeight);
MediaCodec mediaCodec = MediaCodec.createEncoderByType("video/hevc");
format.setInteger("vendor.mtk.ext.venc.qpvbr.upper-enable", 1);
format.setInteger("vendor.mtk.ext.venc.qpvbr.qp-upper-threshold", 40);
format.setInteger("vendor.mtk.ext.venc.qpvbr.qp-max-bitrate-ratio", 135);
mediaCodec.configure(format, null, null, MediaCodec.CONFIGURE_FLAG_ENCODE);
- The following example sets QP 17 as the threshold to trigger QPVBR undershoot-ing, with a minimum undershoot not exceeding 20% of the target bitrate, while disabling QPVBR overshooting.
MediaFormat format = MediaFormat.createVideoFormat(mMimeType, mWidth, mHeight);
MediaCodec mediaCodec = MediaCodec.createEncoderByType("video/hevc");
format.setInteger("vendor.mtk.ext.venc.qpvbr.upper-enable", 0);
format.setInteger("vendor.mtk.ext.venc.qpvbr.lower-enable", 1);
format.setInteger("vendor.mtk.ext.venc.qpvbr.qp-lower-threshold", 17);
format.setInteger("vendor.mtk.ext.venc.qpvbr.qp-min-bitrate-ratio", 80);
mediaCodec.configure(format, null, null, MediaCodec.CONFIGURE_FLAG_ENCODE);
- The following example disables both QPVBR overshooting and undershooting.
MediaFormat format = MediaFormat.createVideoFormat(mMimeType, mWidth, mHeight);
MediaCodec mediaCodec = MediaCodec.createEncoderByType("video/hevc");
format.setInteger("vendor.mtk.ext.venc.qpvbr.upper-enable", 0);
format.setInteger("vendor.mtk.ext.venc.qpvbr.lower-enable", 0);
mediaCodec.configure(format, null, null, MediaCodec.CONFIGURE_FLAG_ENCODE);
- The following example uses the old API on the old platform to set QP 34 as the threshold to trigger QPVBR overshooting, with a maximum overshoot not exceeding 20% of the target bitrate.
MediaFormat format = MediaFormat.createVideoFormat(mMimeType, mWidth, mHeight);
MediaCodec mediaCodec = MediaCodec.createEncoderByType("video/hevc");
format.setInteger("vendor.mtk.ext.venc.qpvbr.enable", 1);
format.setInteger("vendor.mtk.ext.venc.qpvbr.qp-threshold", 34);
format.setInteger("vendor. mtk.ext.venc.qpvbr.qp-bitrate-ratio", 120);
mediaCodec.configure(format, null, null, MediaCodec.CONFIGURE_FLAG_ENCODE);
3.2 Chroma QP Offset
Chroma QP offset refers to the adjustment of Quantization Parameters (QP) specifically for chroma channels, which carry color information in a video. The chroma channels are divided into two components:
- Cr (red-difference chroma): Add red component QP offset before mapping from luma QP.
- Cb (blue-difference chroma): Add blue component QP offset before mapping from luma QP.
Chroma QP offset is an adjustment applied specifically to the chroma plane's QP values. A negative offset indicates an improvement in quality for the chroma plane.
|
Index Key |
Input type/range |
Description |
|
Int32 -12 - 12 |
Specifically adjusts the QP offset for the Cr channel. |
|
|
mtk.ext.venc.chroma.qp.cb-qp-offset |
Int32 -12 - 12 |
Specifically adjusts the QP offset for the Cb channel. |
3.2.1 Detailed Explanation
In the YUV color space, video data is divided into two planes: luma (Y) and chroma (U and V). The luma plane represents brightness, while the chroma plane represents color information.
Human eyes are generally more sensitive to brightness (luma) than to color (chroma). However, in some encoded video results, noticeable color shifts or color blocks may occur. These artifacts are often the result of compression losses, where the reduction in data leads to a loss of color information and the appearance of blocky or shifted colors. Compression algorithms often prioritize luma information over chroma to save bitrate, which can exacerbate these issues.
Adjusting the chroma QP offset involves a trade-off between the quality of the luma and chroma planes. Some objective quality indices are calculated based on the luma plane, so increasing the quality of the chroma plane might slightly reduce the objective quality index score. However, the subjective visual effect perceived by the human eye may improve.
When configuring video encoding settings, developers can adjust the chroma QP offset to balance the quality between the luma and chroma planes. For example, if the encoded video shows noticeable color artifacts, a negative chroma QP offset can be applied to enhance the color quality.
3.2.2 Example Configuration
Below is a code snippet that demonstrates how to adjust the chroma qp offset setting.
- The following example sets the Cr and Cb QP offsets to -12 to enhance the quality of the chroma plane.
MediaFormat format = MediaFormat.createVideoFormat(mMimeType, mWidth, mHeight);
MediaCodec mediaCodec = MediaCodec.createEncoderByType("video/hevc");
format.setInteger("vendor.mtk.ext.venc.chroma.qp.cb-qp-offset", -12);
format.setInteger("vendor.mtk.ext.venc.chroma.qp.cr-qp-offset", -12);
mediaCodec.configure(format, null, null, MediaCodec.CONFIGURE_FLAG_ENCODE);
- The following example disables the chroma QP offset.
MediaFormat format = MediaFormat.createVideoFormat(mMimeType, mWidth, mHeight);
MediaCodec mediaCodec = MediaCodec.createEncoderByType("video/hevc");
format.setInteger("vendor.mtk.ext.venc.chroma.qp.cb-qp-offset", -12);
format.setInteger("vendor.mtk.ext.venc.chroma.qp.cr-qp-offset", -12);
mediaCodec.configure(format, null, null, MediaCodec.CONFIGURE_FLAG_ENCODE);
3.3 QP Frame Limiter
QP Limiter controls the oscillation magnitude of QP adjustments made by the rate control (RC) system across various frames (I, P, and B) during the encoding process. Adjusting these values can help maintain consistent visual quality throughout the video while still allowing some variation to adapt to different content complexities.
|
Index Key |
Input type/range |
Description |
|
Int32 0 - 30 |
Specifically adjusts the QP limiter for I frame. |
|
|
mtk.ext.venc.qp.limiter.p-frame-qp-limiter |
Int32 0 - 30 |
Specifically adjusts the QP limiter for P frame. |
|
mtk.ext.venc.qp.limiter.b-frame-qp-limiter |
Int32 0 - 30 |
Specifically adjusts the QP limiter for B frame. |
3.3.1 Detailed Explanation
The QP limiter influences the extent of QP changes during the encoding process. It sets the allowable range for QP adjustments between frames.
The size of the limiter determines the permissible range of QP changes. A smaller limiter value means that QP changes are more restricted, leading to more consistent visual quality. Conversely, a larger limiter value allows for greater QP variation, which can result in more noticeable changes in visual quality but enables more precise bitrate control.
Quality and bitrate are inherently a trade-off in the encoding process. For scenarios where high visual quality is paramount and bitrate constraints are less stringent, such as general camera recording, setting a lower QP limiter can ensure stable quality between frames. On the other hand, for applications like Wi-Fi display or video conferencing, where visual quality requirements are relatively lower but strict bitrate control is essential, a higher QP limiter can provide more precise bitrate management, ensuring stable bitrate levels.
When configuring video encoding settings, developers can adjust the QP limiter to balance the trade-off between visual quality and bitrate control based on the specific requirements of the application.
3.3.2 Example Configuration
Below is a code snippet that demonstrates how to set QP frame limiter.
- The following example increases the QP frame limiter throughout the entire encoding process to enhance bitrate control.
MediaFormat format = MediaFormat.createVideoFormat(mMimeType, mWidth, mHeight);
MediaCodec mediaCodec = MediaCodec.createEncoderByType("video/hevc");
format.setInteger("vendor.mtk.ext.venc.qp.limiter.i-frame-qp-limiter", 30);
format.setInteger("vendor.mtk.ext.venc.qp.limiter.p-frame-qp-limiter", 30);
format.setInteger("vendor.mtk.ext.venc.qp.limiter.b-frame-qp-limiter", 30);
mediaCodec.configure(format, null, null, MediaCodec.CONFIGURE_FLAG_ENCODE);
- The following example decreases the QP frame limiter throughout the entire encoding process to stabilize quality variations between frames.
MediaFormat format = MediaFormat.createVideoFormat(mMimeType, mWidth, mHeight);
MediaCodec mediaCodec = MediaCodec.createEncoderByType("video/hevc");
format.setInteger("vendor.mtk.ext.venc.qp.limiter.i-frame-qp-limiter", 3);
format.setInteger("vendor.mtk.ext.venc.qp.limiter.p-frame-qp-limiter", 5);
format.setInteger("vendor.mtk.ext.venc.qp.limiter.b-frame-qp-limiter", 5);
mediaCodec.configure(format, null, null, MediaCodec.CONFIGURE_FLAG_ENCODE);
- The following example adjusts the QP limiter for I frames only throughout the entire encoding process to enhance bitrate control for I frames, while P and B frames use the encoder's default settings.
MediaFormat format = MediaFormat.createVideoFormat(mMimeType, mWidth, mHeight);
MediaCodec mediaCodec = MediaCodec.createEncoderByType("video/hevc");
format.setInteger("vendor.mtk.ext.venc.qp.limiter.i-frame-qp-limiter", 30);
mediaCodec.configure(format, null, null, MediaCodec.CONFIGURE_FLAG_ENCODE);
- The following example dynamically adjusts the QP limiter for I frames & B frame during the encoding process to enhance bitrate control for subsequent I frames, while B frames use the encoder's default settings.
mediaCodec.start();
while encoding {
// ifrm_qp_ltr = some value
…
Bundle param = new Bundle();
bundle.putInt("vendor.mtk.ext.venc.qp.limiter.i-frame-qp-limiter", ifrm_qp_ltr);
bundle.putInt("vendor.mtk.ext.venc.qp.limiter.p-frame-qp-limiter", pfrm_qp_ltr);
mediaCodec.setParameters(param);
- }
3.4 Initial Frame QP
Initial QP determines the starting QP value for the Rate Control (RC) system. From this point, the RC will adjust QP values to identify the optimal balance between visual quality and compression efficiency.
|
Index Key |
Input type/range |
Description |
|
Int32 [-1, 0, 1] |
Determines whether to use initial qp. -1: Use default settings. 0: Disable initial qp. 1: Enable initial qp. The default setting is based on the preset value within the codec driver for different scenarios. |
|
|
Int32 0 - 51 |
Specifically adjusts the initial QP for I frame. |
|
|
Int32 0 - 51 |
Specifically adjusts the initial QP for P frame. |
|
|
Int32 0 - 51 |
Specifically adjusts the initial QP for B frame. |
3.4.1 Detailed Explanation
The initial QP sets the initial QP value for the RC system when encoding the first frame. During the encoding process, the RC system will gradually adjust and converge the QP values to find the optimal QP that meets the target bitrate (TBR).
Different scenes and target bitrates require different QP values for optimal encoding. An appropriate initial QP setting can help the QP values converge more quickly to the optimal level, ensuring efficient encoding.
For scenes with high complexity, a higher initial QP can prevent the generation of excessively large encoded frames before the QP values converge. This helps in maintaining a more stable bitrate and avoiding large fluctuations in frame size.
Setting the initial QP based on the expected content of the scenes. By doing so, they can avoid instability in bitrate and quality during the initial frames, leading to a smoother encoding process.
When configuring video encoding settings, developers can adjust the init QP to ensure a stable and efficient encoding process, especially during the initial frames.
3.4.2 Example Configuration
Below is a code snippet that demonstrates how to set initial frame qp.
- The following example sets the initial QP for each frame throughout the entire encoding process. Since the encoder defaults to applying the initial QP to the first frame, set init QP enable to 0.
MediaFormat format = MediaFormat.createVideoFormat(mMimeType, mWidth, mHeight);
MediaCodec mediaCodec = MediaCodec.createEncoderByType("video/hevc");
format.setInteger("vendor.mtk.ext.venc.init.qp.enable", 0);
format.setInteger("vendor.mtk.ext.venc.init.qp.i-frame-init-qp", 34);
format.setInteger("vendor.mtk.ext.venc.init.qp.p-frame-init-qp", 35);
format.setInteger("vendor.mtk.ext.venc.init.qp.b-frame-init-qp", 36);
mediaCodec.configure(format, null, null, MediaCodec.CONFIGURE_FLAG_ENCODE);
- The following example sets the initial QP for I frames throughout the entire encoding process, while P and B frames use the encoder's default settings.
MediaFormat format = MediaFormat.createVideoFormat(mMimeType, mWidth, mHeight);
MediaCodec mediaCodec = MediaCodec.createEncoderByType("video/hevc");
format.setInteger("vendor.mtk.ext.venc.init.qp.enable", 0);
format.setInteger("vendor.mtk.ext.venc.init.qp.i-frame-init-qp", 34);
mediaCodec.configure(format, null, null, MediaCodec.CONFIGURE_FLAG_ENCODE);
- The following example dynamically sets the initial QP for a specific frame during the encoding process.
while encoding {
// ifrm_init_qp = some value
// pfrm_init_ltr = some value
…
Bundle param = new Bundle();
bundle.putInt("vendor.mtk.ext.venc.init.qp.enable", 1);
bundle.putInt("vendor.mtk.ext.venc.init.qp.i-frame-init-qp", ifrm_init_qp);
bundle.putInt("vendor.mtk.ext.venc.init.qp.p-frame-init-qp", pfrm_init_ltr);
mediaCodec.setParameters(param);
}
3.5 MBRC (Macroblock Rate Control)
Adjusting per-block MB QP Sensitivity. Increasing MB RC Tracking Speed can improve the accuracy of the frame size generated per frame, albeit with a slight impact on visual quality.
|
Index Key |
Input type/range |
Description |
|
Int32 0 - 63 |
Higher values indicate greater sensitivity; lower values indicate reduced sensitivity |
3.5.1 Detailed Explanation
MBRC tracking speed adjusts the ability to track bitrate on a per-macroblock (MB) basis. It determines the QP trajectory for each MB based on the encoding results at any given moment. The higher the tracking speed value, the more aggressive the adjustments, leading to more precise bitrate control.
The QP limiter interacts with MBRC by restricting the QP trajectory it determines. If the QP limiter is set to allow only small QP oscillations, the adjustments made by MBRC will be clipped, limiting its ability to track and control the bitrate effectively. This interaction ensures that while MBRC aims for precise bitrate control, the QP limiter maintains stability in the QP adjustments.
When configuring video encoding settings, developers can adjust the MBRC sensitivity to balance the trade-off between precise bitrate control and visual quality, depending on the specific requirements of the application.
For scenarios requiring stringent bitrate control, increasing the MBRC sensitivity can enhance the precision of bitrate management. However, this may result in more noticeable variations in visual quality between frames.
3.5.2 Example Configuration
Below is a code snippet that demonstrates how to set MBRC tracking-speed.
- The following example sets a high MBRC tracking speed value for the entire sequence to enhance bitrate control.
MediaFormat format = MediaFormat.createVideoFormat(mMimeType, mWidth, mHeight);
MediaCodec mediaCodec = MediaCodec.createEncoderByType(MediaFormat.MIMETYPE_VIDEO_AVC);
format.setInteger("vendor.mtk.ext.venc.mbrc.tracking-speed", 63);
mediaCodec.configure(format, null, null, MediaCodec.CONFIGURE_FLAG_ENCODE);
- The following example dynamically sets the MBRC tracking speed for a specific frame during the encoding process.
mediaCodec.start();
while encoding {
Bundle param = new Bundle();
bundle.putInt("vendor.mtk.ext.venc.mbrc.tracking-speed", mbrc_tks);
mediaCodec.setParameters(param);
}
3.6 Min/Max QP
Min and max QP are used to control the QP range of frames during the video encoding process. These settings help manage the balance between visual quality and bitrate efficiency. We categorize them into two types: Global min/max QP and Frame-level min/max QP.
3.6.1 Detailed Explanation
- QP in Video Encoding
Quantization Parameter (QP) is a crucial factor in video encoding that directly affects the final quality of the encoded video stream. Lower QP values result in higher visual quality but also increase the bitrate. Conversely, higher QP values reduce the visual quality but decrease the bitrate. Therefore, managing QP values is essential to achieving the desired balance between quality and bitrate.
- Global Min/Max QP
These are hard constraints on the QP values. The encoded frame will never exceed the specified QP range. This strict limitation can significantly impact the precision of bitrate control during the encoding process.
- Frame-level Min/Max QP
These are soft constraints that limit the overall average QP while allowing individual frames to sometimes exceed the set range. The range of frame-level min/max QP must be within that of global min/max QP. If it extends beyond, it will be bound by the global min/max QP settings. Frame-level min/max QP is optional and, when enabled, provides more precise control over the QP values of individual frames.
- Global QP vs. Frame-level QP
The min/max QP settings are used to adjust the upper and lower bounds of QP during the encoding process. This prevents the QP from being too low, which would cause a significant increase in bitrate, or too high, which would lead to a severe drop in quality.
For example, if the global min QP is set to 20 and the frame-level min QP is also set to 20, the minimum QP for frames will be restricted to 20. However, the QP for individual blocks within the frame can still drop below 20.
Users can adjust the min/max QP settings based on the content of the scenes. For simpler scenes, increasing the min QP can prevent the encoder from excessively pursuing quality (low QP), thus avoiding unnecessary bitrate usage. Conversely, for more complex scenes, lowering the max QP can prevent the encoder from overly reducing the bitrate, which would compromise the visual quality.
Setting a relatively loose global min/max QP range can prevent bitrate and quality from becoming uncontrollable due to changes in scene content. Frame-level min/max QP can then be used for further fine-tuning to achieve the desired balanc.
3.6.2 Example Configuration
Below is a code snippet that demonstrates how to set min/max QP.
- The following example sets the global min QP to 16 and the global max QP to 47 for the entire sequence to enhance bitrate control.
MediaFormat format = MediaFormat.createVideoFormat(mMimeType, mWidth, mHeight);
MediaCodec mediaCodec = MediaCodec.createEncoderByType("video/hevc");
format.setInteger("vendor.mtk.venc.dynamic.qpbound.max", 16);
format.setInteger("vendor.mtk.venc.dynamic.qpbound.min", 47);
mediaCodec.configure(format, null, null, MediaCodec.CONFIGURE_FLAG_ENCODE);
- The following example sets the global min QP to 15 and the global max QP to 48 for the entire sequence, while enabling frame level QP and setting the frame level min QP to 20 and the frame level max QP to 39.
MediaFormat format = MediaFormat.createVideoFormat(mMimeType, mWidth,mHeight);
MediaCodec mediaCodec = MediaCodec.createEncoderByType("video/hevc");
format.setInteger("vendor.mtk.venc.dynamic.qpbound.max", 15);
format.setInteger("vendor.mtk.venc.dynamic.qpbound.min", 48);
format.setInteger("vendor.mtk.venc.dynamic.qpbound.avg-qp-enabled", 1);
format.setInteger("vendor.mtk.venc.dynamic.qpbound.avg-qp-max", 20);
format.setInteger("vendor.mtk.venc.dynamic.qpbound.avg-qp-min", 39);
mediaCodec.configure(format, null, null, MediaCodec.CONFIGURE_FLAG_ENCODE);
- The following example sets the global min QP to 15 and the global max QP to 48 for the entire sequence, while disabling frame level QP.
MediaFormat format = MediaFormat.createVideoFormat(mMimeType, mWidth,mHeight);
MediaCodec mediaCodec = MediaCodec.createEncoderByType("video/hevc");
format.setInteger("vendor.mtk.venc.dynamic.qpbound.max", 15);
format.setInteger("vendor.mtk.venc.dynamic.qpbound.min", 48);
format.setInteger("vendor.mtk.venc.dynamic.qpbound.avg-qp-enabled", 0);
mediaCodec.configure(format, null, null, MediaCodec.CONFIGURE_FLAG_ENCODE);
- The following example dynamically changes the global min and the frame level min/max QP during the encoding process.
mediaCodec.start();
while encoding {
//max_qp = some value
//min_qp = some value
//frame_level_max_qp = some value
//frame_level_min_qp = some value
…
Bundle param = new Bundle();
bundle.putInt("vendor.mtk.venc.dynamic.qpbound.max", max_qp);
bundle.putInt("vendor.mtk.venc.dynamic.qpbound.min", min_qp);
bundle.putInt("vendor.mtk.venc.dynamic.qpbound.avg-qp-enabled", 1);
bundle.putInt("vendor.mtk.venc.dynamic.qpbound.avg-qp-max", frame_level_max_qp);
bundle.putInt("vendor.mtk.venc.dynamic.qpbound.avg-qp-min", frame_level_min_qp);
mediaCodec.setParameters(param);
}
- The following example dynamically changes the global min QP to 13 and the frame level min QP to 15 during the encoding process.
mediaCodec.start();
while encoding {
Bundle param = new Bundle();
bundle.putInt("vendor.mtk.venc.dynamic.qpbound.min", 13);
bundle.putInt("vendor.mtk.venc.dynamic.qpbound.avg-qp-enabled", 1);
bundle.putInt("vendor.mtk.venc.dynamic.qpbound.avg-qp-min", 15);
mediaCodec.setParameters(param);
}
3.7 Visual Quality
Visual Quality settings, including VisualQuant and VisualRD components, play a crucial role in balancing the visual quality of flat and high-frequency detail regions in the encoded video. These settings help optimize the visual experience by adjusting the QP values and bit allocation for different types of scenes.
|
Input type/range |
Description |
|
|
Int32 0 - 24 |
Adaptive quantization to reduce distortion of smooth region. A larger value indicates a stronger adjustment. |
|
|
mtk.ext.venc.visual.rd |
Int32 0 - 63 |
Adding texture richness. A larger value indicates a stronger adjustment. |
3.7.1 Detailed Explanation
VisualQuant focuses on balancing the trade-off between bit count and visual quality for both complex and flat regions. By adjusting the QP values differently for these regions, VisualQuant influences the final visual quality.
- High VisualQuant
Increases QP values for complex scenes, reducing bit count and slightly lowering quality in these areas. Decreases QP values for flat regions, improving visual quality where distortions are more noticeable to the human eye.
- Low VisualQuant
Decreases QP values for complex scenes, enhancing visual quality in these areas. Increases QP values for flat regions, which may reduce visual quality.
In summary, a high VisualQuant setting improves quality in flat regions at the expense of complex regions, while a low VisualQuant setting does the opposite. Human eyes are more sensitive to changes in flat regions, so VisualQuant primarily targets these areas to enhance visual quality.
- VisualRD
VisualRD settings focus on the trade-off between bit count and visual roughness. Adjusting VisualRD can lead to better visual results in various scenes, including those with low light, noise, or complex textures such as grass and tiles.
- High VisualRD
May increase the bit count but preserves details and maintains a visually more pleasing result in complex scenes or settings.
- Low VisualRD
Leads to smoother visual results but may sacrifice some high-frequency details. VisualRD allows the encoded video to retain more details in complex scenes, resulting in better visual quality, especially in challenging environments.
Adjust VisualQuant based on the importance of flat versus complex regions in the scene. For scenes with significant flat areas, a higher VisualQuant setting can enhance visual quality by reducing distortions. Conversely, for scenes with more complex regions, a lower VisualQuant setting can improve the quality of these areas.
For low-light recordings, grass, tiles, or other complex textures, increasing VisualRD can enhance visual quality by preserving more details, even though it may lead to a higher bitrate. This is particularly useful for scenes where maintaining detail is crucial.
Both VisualQuant and VisualRD settings primarily aim to enhance visual quality. However, they may not always result in gains in objective quality metrics. Therefore, adjustments should be made based on the specific visual requirements of the content being encoded.
3.7.2 Example Configuration
Below is a code snippet that demonstrates how to set visual quality relative setting.
- The following example sets the VisualQuant to 10 for the entire sequence to enhance the visual quality of flat areas.
MediaFormat format = MediaFormat.createVideoFormat(mMimeType, mWidth,mHeight);
MediaCodec mediaCodec = MediaCodec.createEncoderByType("video/hevc");
format.setInteger("vendor.mtk.ext.venc.visual.quant", 10);
mediaCodec.configure(format, null, null, MediaCodec.CONFIGURE_FLAG_ENCODE);
- The following example sets the VisualRD to 24 for the entire sequence to enhance the detail retention in complex areas.
MediaFormat format = MediaFormat.createVideoFormat(mMimeType, mWidth,mHeight);
MediaCodec mediaCodec = MediaCodec.createEncoderByType("video/hevc");
format.setInteger("vendor.mtk.ext.venc.visual.rd", 24);
mediaCodec.configure(format, null, null, MediaCodec.CONFIGURE_FLAG_ENCODE);
- The following example dynamically sets VisualQuant and VisualRD during the encoding process based on changes in the content.
while encoding {
// visual_quant = some value
// visual_rd = some value
…
Bundle param = new Bundle();
bundle.putInt("vendor.mtk.ext.venc.visual.quant", visual_quant);
bundle.putInt("vendor.mtk.ext.venc.visual.rd", visual_rd);
mediaCodec.setParameters(param);
}
3.8 Encode Mode
Different scenarios require varying demands from the encoder, often emphasizing power consumption, encoding efficiency, quality, and performance differently. To cater to these diverse needs, MTK provides three basic modes: Low Power Mode, High Quality Mode, and Ultra High Quality Mode. Each mode offers different levels of support for power consumption, performance, and encoding efficiency.
|
Input type/range |
Description |
|
|
Int32 [0, 1] |
Determines whether to enable quality mode. Legacy platform default setting is low power mode and only support low power mode and high quality mode, so only need to set feature on to enable high quality mode |
|
|
Int32 [0, 1, 2] |
0: low power mode 1: high quality mode 2: ultra high quality mode The default setting is based on the preset value within the codec driver for different scenarios. |
3.8.1 Detailed Explanation
- Low Power Mode
- Focus
Power saving and performance.
- Description
This mode prioritizes reducing power consumption and maintaining high performance. It is ideal for scenarios where battery life and high frame rates are more critical than the highest possible encoding quality.
Suitable for mobile devices or applications where extended battery life is essential, and the visual quality can be slightly compromised.
- High Quality Mode
- Focus
Balanced trade-off between power consumption, performance, and encoding quality.
- Description
This mode sacrifices some power efficiency and performance to enhance encoding efficiency and visual quality. It strikes a balance, making it suitable for most general-purpose applications.
Ideal for scenarios where a moderate improvement in visual quality is needed without significantly impacting power consumption and performance.
Encoding efficiency and visual quality.
- Description
This mode prioritizes encoding efficiency and visual quality above all else, even if it means higher power consumption and lower performance. It is designed for applications where the highest possible visual quality is paramount.
Best suited for professional video production or high-end applications where visual quality is the top priority, and power consumption is less of a concern.
Users can select the appropriate mode based on the specific requirements of their scenario. For instance, if the goal is to achieve higher frame rates and conserve battery life, Low Power Mode is the best choice. If the focus is on achieving better encoding efficiency and visual quality, High Quality Mode or Ultra High Quality Mode would be more suitable.
The impact of each mode on power consumption, performance, encoding efficiency, and quality can vary depending on the resolution and complexity of the content being encoded. Higher resolutions may see more significant differences between the modes.
3.8.2 Example Configuration
Below is a code snippet that demonstrates how to set encode mode.
- The following example sets the high quality mode on legacy platforms to increase encoding efficiency and quality.
MediaFormat format = MediaFormat.createVideoFormat(mMimeType, mWidth,mHeight);
MediaCodec mediaCodec = MediaCodec.createEncoderByType("video/hevc");
format.setInteger("vendor.mtk.ext.venc.highquality.feature-on", 1);
mediaCodec.configure(format, null, null, MediaCodec.CONFIGURE_FLAG_ENCODE);
- The following example sets the low power mode to save power and increase performance.
MediaFormat format = MediaFormat.createVideoFormat(mMimeType, mWidth,mHeight);
MediaCodec mediaCodec = MediaCodec.createEncoderByType("video/hevc");
format.setInteger("vendor.mtk.ext.venc.highquality.feature-on", 1);
format.setInteger("vendor.mtk.ext.venc.highquality.mode", 0);
mediaCodec.configure(format, null, null, MediaCodec.CONFIGURE_FLAG_ENCODE);
- The following example sets the high quality mode to increase encoding efficiency and quality.
MediaFormat format = MediaFormat.createVideoFormat(mMimeType, mWidth,mHeight);
MediaCodec mediaCodec = MediaCodec.createEncoderByType("video/hevc");
format.setInteger("vendor.mtk.ext.venc.highquality.feature-on", 1);
format.setInteger("vendor.mtk.ext.venc.highquality.mode", 1);
mediaCodec.configure(format, null, null, MediaCodec.CONFIGURE_FLAG_ENCODE);
3.9 I-Frame Smoothing
I-frame smoothing is a feature designed to address the issue of large I-frames in video encoding . In scenarios where bitrate stability is crucial, such as video conferencing, large I-frames can cause sudden spikes in bitrate, leading to frame drops and degraded video quality. I-frame smoothing helps mitigate this problem by limiting the size of I-frames to ensure a more consistent and stable bitrate.
|
Input type/range |
Description |
|
|
30 - 255 |
Absolute size limit for I frame. The set value divided by 10 represents the multiplier. For example, setting it to 165 means that the maximum size of an I-frame will not exceed 16.5 times the average bitrate. |
|
|
Int32 0 - 100 |
The set value represents a percentage. For example, setting it to 90 means that the maximum limit will not exceed 90% of the bitrate of the previous frame. |
3.9.1 Detailed Explanation
In video encoding, frames are categorized into three types: I-frames, P-frames, and B-frames. I-frames, or Intra-coded frames, contain a complete image and serve as reference points for decoding subsequent frames. P-frames, or Predicted frames, store only the changes from the previous frame, making them smaller in size. B-frames, or Bidirectional predicted frames, store changes from both previous and subsequent frames, allowing for even greater compression. Among these, I-frames are typically much larger than P-frames and B-frames. This size disparity can cause issues in bitrate-sensitive scenarios, such as video conferencing, where large I-frames may lead to sudden spikes in bitrate, resulting in frame drops and affecting the overall quality of the video stream.
- Principle of I-Frame Smoothing
The principle of I-frame smoothing is to limit the size of I-frames so that they do not exceed a certain multiple of the average target bitrate (TBR). For example, if the TBR is set to 30 Mbps and the frame rate is 30 fps, the average bitrate per frame would be around 1 Mbps. By setting a limit that I-frames cannot exceed 8 times the average bitrate, the maximum size of an I-frame would be constrained to approximately 8 Mbps.
- Absolute Size Limit
The setting vendor.mtk.ext.venc.i.frame.control.size.max-i-ratio directly limits the maximum average bitrate multiple for I-frames, with a minimum limit of 3 times the average bitrate.
- Relative Size Limit
The setting vendor.mtk.ext.venc.i.frame.control.size.shrink-i-ratio adjusts the I-frame size based on the size of the previous I-frame. For example, if the previous I-frame was 10 times the average bitrate, setting this to 90% would limit the next I-frame to 9 times the average bitrate. This relative calculation also ensures that the limit does not go below 3 times the average bitrate
During the encoding process, there is a minimum bitrate consumption. If the bitrate is set too low or the multiple is too restrictive, the actual bitrate may still exceed the intended limit. Therefore, it is important to balance the settings to achieve the desired results.
- Practical Application
In scenarios where network conditions are variable, users can adjust the bitrate and dynamically limit the I-frame size to avoid frame drops caused by large I-frames. This is particularly useful in video conferencing, where maintaining a stable and smooth video stream is essential.
3.9.2 Example Configuration
Below is a code snippet that demonstrates how to set I frame smoothing.
- The following example sets an absolute size limit for I-frames during the encoding process, setting it to eight times the average bitrate.
while encoding {
…
Bundle param = new Bundle();
bundle.putInt("vendor.mtk.ext.venc.i.frame.control.size.max-i-ratio", 80);
mediaCodec.setParameters(param);
}
- The following example sets a relative size limit based on the previous I-frame, setting it to 90% of the previous frame.
while encoding {
…
Bundle param = new Bundle();
bundle.putInt("vendor.mtk.ext.venc.i.frame.control.size.shrink-i-ratio", 90);
mediaCodec.setParameters(param);
}
3.10 B-Frame Compatibility Settings
B-Frame Compatibility Settings are designed to enhance the compatibility of video streams with various decoding devices, particularly those with limited decoding capabilities. By providing options to fix the number of B-frames and clean the GOP (Group of Pictures), this feature ensures smoother playback and better performance across a wide range of devices.
3.10.1 Detailed Explanation
In video encoding, frames are categorized into three types: I-frames, P-frames, and B-frames. I-frames contain a complete image and serve as reference points for decoding subsequent frames. P-frames store only the changes from the previous frame, making them smaller in size. B-frames, on the other hand, store changes from both previous and subsequent frames, allowing for greater compression.

B-frames offer several advantages. They can significantly reduce the overall bitrate of a video stream by referencing both past and future frames, which leads to higher compression efficiency. Additionally, by using information from multiple frames, B-frames help maintain higher visual quality at lower bitrates. However, the use of B-frames also comes with disadvantages. The increased complexity of both encoding and decoding processes can be challenging for devices with weaker decoding capabilities, leading to playback issues. Furthermore, B-frames at the end of a GOP may reference the I-frame of the next GOP, causing cross-GOP referencing that some devices may struggle to handle.
- Compatibility Settings
To address these challenges, MTK B-Frame Compatibility Settings offer two main configurations:
- Fix B-Frame
In newer flagship devices, encoders support adaptive B-frames, where the encoder calculates the optimal number of B-frames based on the input frames to achieve the best encoding efficiency. However, this dynamic calculation can increase power consumption and reduce performance. The Fix B-Frame setting disables dynamic B-frame calculation, using a fixed number of B-frames instead. This reduces the computational load and enhances compatibility with devices that may not support dynamic B-frames.
- Clean GOP
At the end of a GOP, B-frames may reference the I-frame of the next GOP. This cross-GOP referencing can cause issues on devices with weaker decoding capabilities, as they may struggle to handle such complex references. The Clean GOP setting replaces the B-frames at the end of a GOP with P-frames, which only reference previous frames within the same GOP. This eliminates cross-GOP references and enhances compatibility with a broader range of devices.

- Practical Application
B-Frame Compatibility Settings are particularly useful in scenarios where the decoding capabilities of the receiving devices are limited or where compatibility with a wide range of devices is crucial. For example:
- IoT Devices
Many IoT devices have limited processing power and may struggle with complex video decoding tasks. By using the B-Frame Compatibility Settings, developers can ensure that the video streams are compatible with these devices, preventing playback issues and ensuring smooth performance.
- Legacy Devices
Older devices or those with outdated hardware may not be able to handle dynamic B-frames or cross-GOP references efficiently. Enabling Fix B-Frame and Clean GOP can help maintain compatibility and provide a better user experience on these devices.
3.10.2 Example Configuration
Below is a code snippet that demonstrates how to set B-Frame Compatibility Settings.
- The following example enables the Clean GOP setting to avoid cross-GOP referencing.
MediaFormat format = MediaFormat.createVideoFormat(mMimeType, mWidth,mHeight);
MediaCodec mediaCodec = MediaCodec.createEncoderByType("video/hevc");
format.setInteger("vendor.mtk.ext.venc.clean.gop.enable", 1);
mediaCodec.configure(format, null, null, MediaCodec.CONFIGURE_FLAG_ENCODE);
- The following example uses fixed B-frames, disabling dynamic B-frame calculation. Insert a fixed number of 3 B-frames between P-frames.
MediaFormat format = MediaFormat.createVideoFormat(mMimeType, mWidth,mHeight);
MediaCodec mediaCodec = MediaCodec.createEncoderByType("video/hevc");
format.setInteger("vendor.mtk.ext.venc.fix.b.frame.mode.value", 3);
mediaCodec.configure(format, null, null, MediaCodec.CONFIGURE_FLAG_ENCODE);
3.11 Android Support Feature
In the realm of video encoding, certain features are already supported by the standard interfaces provided by AOSP (Android Open Source Project). To enhance user experience and provide more control over encoding processes, we have compiled a set of key features into our SDK. This allows users to easily adjust and utilize these advanced encoding capabilities. Among the key features included are B-frames, TSVC (Temporal and Spatial Video Coding), and ROI (Region of Interest).
3.11.1 B frames
B-frames, or Bidirectional predicted frames, are a type of frame used in video encoding that reference both previous and subsequent frames to achieve higher compression efficiency.
|
Input type/range |
Description |
|
|
1, 3 |
Insert a fixed number of B-frames between P-frames. (In adaptive case means the maximum number of b-frames can be insert between P-frames). |
3.11.1.1 MTK implementation
B-frames offer significant benefits in terms of compression efficiency, allowing for reduced bitrate while maintaining high video quality. However, they also introduce increased complexity in both encoding and decoding processes.
On older MTK platforms, only fixed B-frames are supported, whereas newer platforms offer adaptive B-frames, which dynamically adjust the number of B-frames based on the input frames to optimize encoding efficiency. This dynamic adjustment can be controlled through the B-frame compatibility settings. While B-frames improve compression, they also increase latency due to the need to reference both preceding and following frames. For detailed usage of B-frame settings, refer to the Android documentation.
3.11.1.2 Example Configuration
Below is a code snippet that demonstrates how to set B Frames.
- The following example enables 3 B-frames for video encode.
MediaFormat format = MediaFormat.createVideoFormat(mMimeType, mWidth,mHeight);
MediaCodec mediaCodec = MediaCodec.createEncoderByType("video/hevc");
format.setInteger(MediaFormat.KEY_MAX_B_FRAMES, 3);
mediaCodec.configure(format, null, null, MediaCodec.CONFIGURE_FLAG_ENCODE);
3.11.2 TSVC (Temporal and Spatial Video Coding)
TSVC (Temporal and Spatial Video Coding) is a technique used in video encoding to provide multiple layers of video quality, allowing for scalable video streams.
|
Input type/range |
Description |
|
|
N denotes the total number of non-bidirectional layers (which must be at least 1) |
||
3.11.2.1 MTK implementation
TSVC offers the advantage of scalability in video streams, enabling different layers of video quality that can be adjusted based on network conditions or device capabilities.
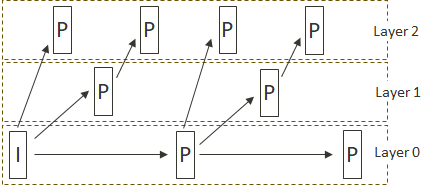
MTK's implementation of TSVC supports up to six layers, providing a high degree of flexibility. However, it is important to note that TSVC cannot be used simultaneously with B-frames. This limitation requires careful consideration when configuring encoding settings to ensure optimal performance and compatibility. For detailed usage of TSVC settings, refer to the Android documentation.
Example Configuration
Below is a code snippet that demonstrates how to set TSVC.
MediaFormat format = MediaFormat.createVideoFormat(mMimeType, mWidth,mHeight);
MediaCodec mediaCodec = MediaCodec.createEncoderByType("video/hevc");
format.setInteger(MediaFormat.KEY_TEMPORAL_LAYERING, "android.generic.6");
mediaCodec.configure(format, null, null, MediaCodec.CONFIGURE_FLAG_ENCODE);
3.11.3 ROI (Region of Interest)
ROI (Region of Interest) allows specific areas of an image to be encoded with different levels of quality, optimizing bitrate usage for important regions.
Detail API description can reference to:
https://developer.android.com/reference/android/media/MediaCodecInfo.CodecCapabilities#FEATURE_Roi
3.11.3.1 MTK implementation
ROI is a powerful feature in video encoding that enables the designation of specific areas within an image to be encoded with higher or lower quality, depending on their importance.
MTK's implementation of ROI supports both map and rect modes. In map mode, the quality settings for various regions of the entire image can be directly specified. In rect mode, specific coordinates for the ROI are provided, allowing for precise control over the quality of designated areas. This flexibility makes ROI particularly useful for applications where certain parts of the image are more critical than others. For detailed usage of ROI settings, refer to the Android documentation.
補充 Sticky
3.11.3.2 Example Configuration
Below is a code snippet that demonstrates how to apply ROI.
- The following example apply ROI by map mode for FHD encode with top 30% as roi region after 47th frame.
MediaFormat format = MediaFormat.createVideoFormat(mMimeType, 1920, 1080);
MediaCodec mediaCodec = MediaCodec.createEncoderByType("video/hevc");
mediaCodec.configure(format, null, null, MediaCodec.CONFIGURE_FLAG_ENCODE);
…
mediaCodec.start();
while encoding {
…
if (frame_idx == 47) {
Bundle param = new Bundle();
int arraySize = ((1920 + 15) / 16) * ((1080 + 15) / 16);
byte[] qpOffsetMap = new byte[arraySize];
int fillSize = (int) (arraySize * 0.3);
for (int i = 0; i < fillSize; i++) {
}
param.putByteArray(MediaCodec.PARAMETER_KEY_QP_OFFSET_MAP, qpOffsetMap);
mediaCodec.setParameters(param);
}
…
}
- The following example apply ROI by rect mode with three roi region.
while encoding {
int top1 = 100, left1 = 100, bottom1 = 200, right1 = 200, offset1 = -10;
int top2 = 300, left2 = 300, bottom2 = 400, right2 = 400, offset2 = 20;
int top3 = 500, left3 = 500, bottom3 = 600, right3 = 600, offset3 = -5;
String roi_string = String.format("%d,%d-%d,%d=%d; %d,%d-%d,%d=%d; %d,%d-%d,%d=%d",
top1, left1, bottom1, right1, offset1,
top2, left2, bottom2, right2, offset2,
top3, left3, bottom3, right3, offset3);
…
Bundle param = new Bundle();
bundle.putInt(MediaCodec. PARAMETER_KEY_QP_OFFSET_RECTS, roi_string);
mediaCodec.setParameters(param);
}
4 SDK 2.0
In video encoding, different scenarios have unique requirements. For instance, camera applications prioritize quality, while communication and transmission scenarios focus on bitrate control. Basic encoding settings may not always meet these diverse needs, necessitating the adjustment of various encoding parameters to achieve the desired results. To simplify this process, MTK introduces scenario-based settings in SDK 2.0. Unlike SDK 1.0, which offered a wide range of customizable features requiring extensive testing, SDK 2.0 provides predefined settings tailored to specific scenarios, allowing users to quickly and easily achieve optimal encoding performance.
|
Input type/range |
Description |
|
|
Int32 [0, 1] |
0: Live streaming |
4.1 Live streaming
The Live Streaming mode focuses on enhancing encoding efficiency and maintaining stable bitrate levels. This is crucial for live broadcast applications, where consistent quality and smooth streaming are essential. By using the Live Streaming mode, developers can ensure a high-quality live streaming experience with reduced bitrate fluctuations and improved encoding performance.
4.1.1 Benfit of Live streaming setting
For the Live Streaming scenario mode, we tested several different YUV datasets to evaluate its performance.
- Encoding Efficiency
To assess encoding efficiency, we compared the PSNR (Peak Signal-to-Noise Ratio) data at different bitrates for the same scene before and after setting the Live Streaming scenario mode. We then calculated the BD-rate to evaluate the encoding efficiency. The table below shows that enabling the Live Streaming scenario mode can improve encoding efficiency by approximately 10%.
|
Bitrate |
PSNR(Default) |
PSNR(Live Streaming |
BD-RATE |
|
|
T1 |
44.95685 dB |
12.3789% |
||
|
9700 kbps |
43.2182 dB |
44.41466 dB |
||
|
7700 kbps |
42.7055 dB |
43.62765 dB |
||
|
5800 kbps |
42.08868 dB |
42.75168 dB |
||
|
T2 |
11500 kbps |
43.38592 dB |
44.54114 dB |
10.4553% |
|
9700 kbps |
43.14128 dB |
43.99409 dB |
||
|
7700 kbps |
42.74868 dB |
43.35928 dB |
||
|
5800 kbps |
42.05329 dB |
42.57372 dB |
||
|
T3 |
11500 kbps |
43.5328 dB |
45.16484 dB |
17.0056% |
|
9700 kbps |
42.99802 dB |
44.59293 dB |
||
|
7700 kbps |
42.46331 dB |
43.75579 dB |
||
|
5800 kbps |
41.89221 dB |
42.75626 dB |
- Bitrate Stability
To evaluate bitrate stability, we tested the difference between the encoded bitrate and the target bitrate under dynamic low bitrate changes. The graph below illustrates that, after setting the Live Streaming scenario mode, the encoded bitrate more closely matches the dynamically set target bitrate.
The horizontal axis represents the GOP (Group of Pictures) index, and the vertical axis represents the bitrate. During the encoding process, we gradually reduced the bitrate and recorded the bitrate variation for each GOP to create this graph. The blue line represents our target bitrate, the gray line represents the default settings, and the orange line shows the results after applying the Live Streaming scenario mode. 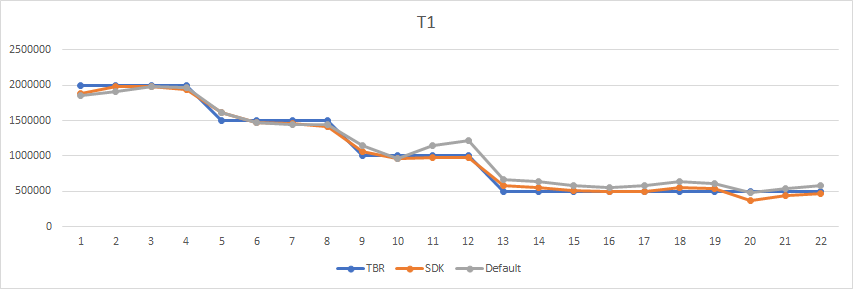

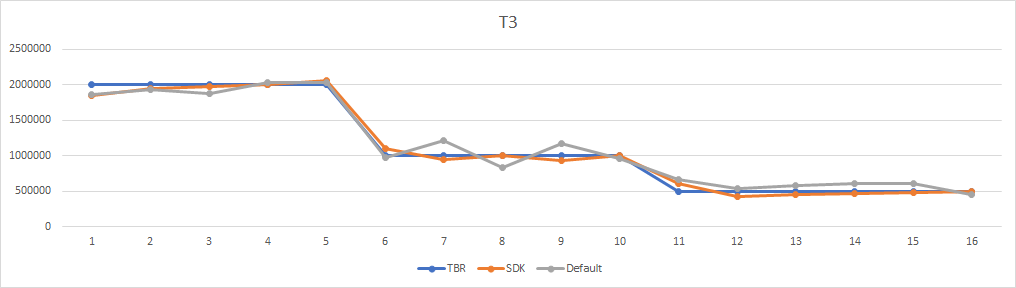
From the graph, it is evident that the Live Streaming scenario mode helps maintain a more stable bitrate, closely aligning with the target bitrate, which is crucial for live streaming applications where consistent quality and smooth streaming are essential.
4.2 Confernece
The Conference mode prioritizes reducing encoding latency and ensuring smooth bitrate control. This is particularly important for video conferencing applications, where low latency and stable transmission are critical for real-time communication. By using the Conference mode, developers can achieve a low-latency, high-stability video conferencing experience, ensuring that participants can communicate effectively without interruptions or quality degradation.
4.2.1 Benfit of Conference Mode
In conference scenarios, improvements are not only seen in video quality and latency but also in the reduction of excessively large I-frames, which can cause transmission issues. One of the key benefits of enabling conference mode is minimizing the occurrence of these large I-frames.
The following chart illustrates the changes in frame size before and after enabling conference mode. The vertical axis represents frame size in bytes, while the horizontal axis represents the frame index.
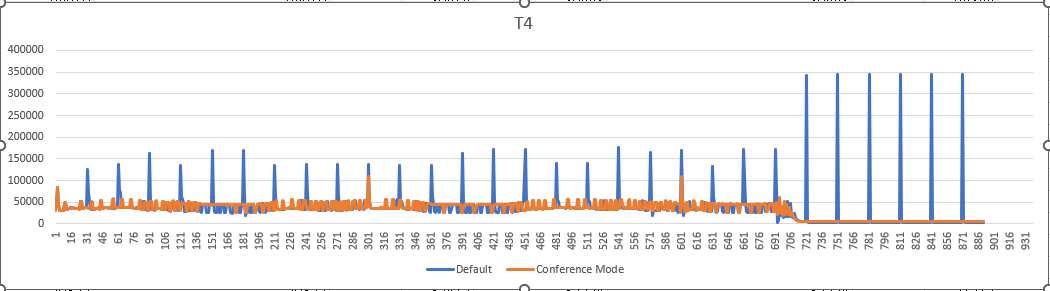
From the chart, it is evident that under the default settings, the presence of I-frames results in consistently large frame sizes. However, after enabling conference mode, there is a significant improvement, with a noticeable reduction in the size of these frames.
This reduction in frame size helps to ensure smoother transmission and better overall performance in conference scenarios, making conference mode a valuable feature for video SDK users.
4.3 Example Configuration for Scenario Mode
Below is a code snippet that demonstrates how to set scenarion mode.
MediaFormat format = MediaFormat.createVideoFormat(mMimeType, mWidth,mHeight);
MediaCodec mediaCodec = MediaCodec.createEncoderByType("video/hevc");
format.setInteger("vendor.mtk.ext.venc.scenario.based.sdk.mode", 0);
mediaCodec.configure(format, null, null, MediaCodec.CONFIGURE_FLAG_ENCODE);
MediaFormat format = MediaFormat.createVideoFormat(mMimeType, mWidth,mHeight);
MediaCodec mediaCodec = MediaCodec.createEncoderByType("video/hevc");
format.setInteger("vendor.mtk.ext.venc.scenario.based.sdk.mode", 1);
mediaCodec.configure(format, null, null, MediaCodec.CONFIGURE_FLAG_ENCODE);
4.4 Recommended Settings for Scenario Mode Using Video SDK 1.0
If the platform does not support the latest SDK 2.0 scenario settings (refer to the next section on Video SDK debug for querying), the following sample code provides recommended parameter settings for using Video SDK 1.0 in live streaming and conference scenarios.
- Live Streaming Recommended Settings
format.setInteger("vendor.mtk.ext.venc.qpvbr.upper-enable", 0);
format.setInteger("vendor. mtk.ext.venc.qpvbr.lower-enable", 0);
// for legacy platform qpvbr
// format.setInteger("vendor.mtk.ext.venc.qpvbr.enable", 0);
format.setInteger("vendor.mtk.ext.venc.chroma.qp.cr-qp-offset", -2);
format.setInteger("vendor.mtk.ext.venc.chroma.qp.cb-qp-offset", -2);
format.setInteger("vendor.mtk.ext.venc.visual.quant", 0);
format.setInteger("vendor.mtk.ext.venc.highquality.feature-on", 1);
format.setInteger("vendor.mtk.ext.venc.highquality.mode", 1);
format.setInteger("max-bframes", 1);
- Conference Recommended Settings
format.setInteger("vendor.mtk.ext.venc.qpvbr.upper-enable", 0);
// for legacy platform qpvbr
// format.setInteger("vendor.mtk.ext.venc.qpvbr.enable", 0);
format.setInteger("vendor.mtk.ext.venc.i.frame.control.size.max-i-ratio", 30);
format.setInteger("vendor.mtk.ext.venc.highquality.feature-on", 1);
format.setInteger("vendor.mtk.ext.venc.highquality.mode", 1);
format.setInteger("i-frame-interval", 10);
format.setInteger("max-bframes", 0);
5 Video SDK Debug
The SDK debug provides two methods: Feature Query and Setting Query. These methods allow users to gain a better understanding of the Video SDK during the development process.
5.1 Feature Query
The Feature Query function uses standard AOSP interfaces to retrieve all supported video SDK vendor keys on the platform. This function helps developers understand which features are supported by the platform and determine which features can be utilized during development.
Note:
- The query results include all supported video SDK vendor keys on the platform.
- The query results may include some internal features, but only the feature keys listed in the document (refer to the list in section 2.5.3) need to be focused on.
- If a feature key is not included in the query results, it indicates that the platform does not support this feature.
Below is a code snippet that demonstrates how to query the support features for different platform.
- The following example create HEVC encoder and query the support vendor for the platform.
MediaFormat format = MediaFormat.createVideoFormat(mMimeType, mWidth, mHeight);
MediaCodec mediaCodec = MediaCodec.createEncoderByType("video/hevc");
Set<String> supportedKeys = mediaCodec.getSupportedVendorParameters();
if (supportedKeys != null) {
for (String key : supportedKeys) {
Log.d("Vendor Parameters", "Key: " + key);
}
}
5.2 Setting Query
In addition to Feature Query, MTK also provides an API to retrieve the parameter settings values used for specific features during the encoding process. This function helps developers monitor and adjust the parameter settings for specific features during encoding.
Note:
- The features whose parameter values can be queried are listed in section 2.5.3.
- Users can register specific features they want to monitor and obtain detailed values during the encoding process.
|
Index Key |
output |
Description |
|
mtk.ext.venc.query.encode.sdk.param.value |
Int32 0,1 |
Enable setting query for video SDK, this feature is disabled by default. |
Below is a code snippet that demonstrates how to query the setting during encode process.
- The following example enable setting query and query the chroma QP offset setting during encode process.
MediaFormat mediaFormat = MediaFormat.createVideoFormat("video/hevc", width, height);
MediaCodec mediaCodec = MediaCodec.createEncoderByType("video/hevc");
List<String> list = new ArrayList<>();
list.add("vendor.mtk.ext.venc.chroma.qp.cb-qp-offset");
list.add("vendor.mtk.ext.venc.chroma.qp.cr-qp-offset");
// register setting to query
mediaCodec.subscribeToVendorParameters(list);
mediaFormat.setInteger("vendor.mtk.ext.venc.query.encode.sdk.param.value", 1);
mediaCodec.start();
while (encoding) {
// Your encoding logic here...
Log.v("Video Setting", mediaCodec.getOutputFormat().toString());
}
5.3 Feature Key List
This section lists all the feature keys included in the entire document, along with their support for the setting query functionality.
6 SDK Testing Tool
In addition to the SDK documentation, we provide a dedicated MTK Video SDK APP to assist users in the development and tuning process. This tool is designed to help users experiment with various encoding parameters and immediately see the results on MTK-supported mobile devices. By using their own test data, users can fine-tune settings to achieve the desired video quality and performance. Once satisfied with the results, users can easily export the optimized parameters and integrate them into their own applications.
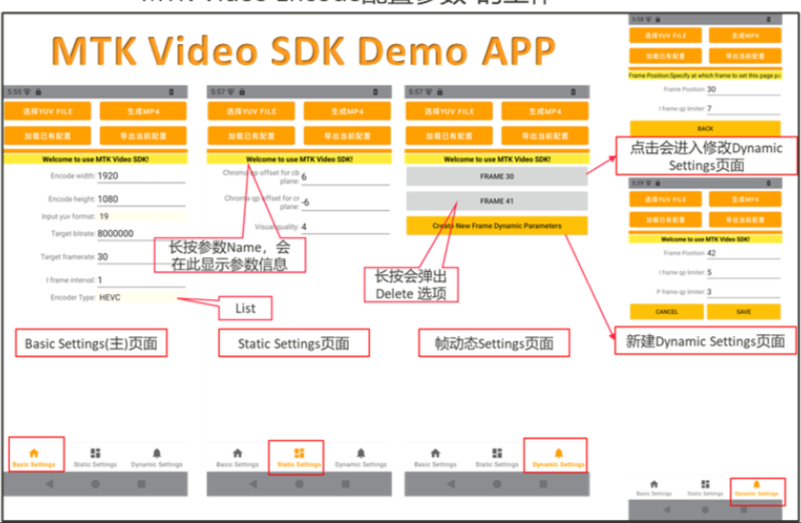
- Key Features
- User-Friendly Interface
The testing app offers an intuitive interface that allows users to easily load their own test data and adjust encoding parameters. This makes it accessible for both novice and experienced developers.
- Quick Feedback
Users can quickly see the effects of their parameter adjustments on the video quality and performance. This rapid feedback is crucial for understanding how different settings impact the final output.
- Comprehensive Parameter Control
The app provides quick access to all encoding parameters offered by the MTK SDK. This comprehensive control allows users to fine-tune every aspect of the encoding process efficiently.
- One-Click Export
Once users have achieved the desired results, the app allows them to export the optimized parameters with a single click. This feature simplifies the process of transferring settings to their own applications, ensuring consistency and efficiency.
7 Note on Document Status
This document is currently in its initial draft version. The content is still undergoing adjustments and expansions to ensure comprehensive coverage and accuracy. We are actively working on refining the details and adding more information to better support your development needs.
We understand that some sections may be incomplete or subject to change, and we appreciate your patience and understanding during this process. The final, official version of the document will be released in the near future, providing a more polished and complete guide to the Mediatek Video SDK
Thank you for your understanding and cooperation!