6. NeuroPilot Examples
This section provides illustrative examples for using the tool suite offered by NeuroPilot to optimize and deploy deep learning neural network models on MediaTek platforms. Through the examples, users can learn how to quantize, prune, and convert pre-trained neural network models for efficient on-device inference. The following examples are provided for an in-depth walkthrough of the steps involved in optimizing and deploying pre-trained models.
6.1 MNIST Example
In this section, we demonstrate the key features of NeuroPilot via a simple yet comprehensive MNIST digit classification example. It is intended to act as a quick start guide for beginners and is the easiest way to get hands-on experience on NeuroPilot’s AI flow. First, we design a simple 5-layer neural network and train it on MNIST dataset. Next, we run this model through the flows of model quantization and model conversion to TensorFlow Lite (TFLite). Quantization considerably decreases the model’s latency and memory footprint without adversely impacting its accuracy, whereas conversion to TFLite makes the model hardware amenable and ready for on-device inference. Finally, we perform model deployment using this TFLite model and demonstrate two methods for the same: 1) an Android application that uses the TFLite model to recognize hand-written digits in real time, and 2) an excutable binary in the deep learning archive (dla) format generated using NeuroPilot’s Neuron Compiler and Runtime.
6.1.1 Introduction
The model implements a 5-layer network very similar to LeNet-5. This is a widely published reference network that is small enough to take minimal time to train and prepare using NeuroPilot. The model in this example also uses batch normalization in the first four layers as opposed to LeNet-5. Batch-normalization proves particularly useful during quantization for generating high quality outputs.
The model in this example also adds batch normalization in the first four layers, which differs from LeNet-5. Batch-normalization improves the weight training process, and leads to better results during quantization. We include batch normalization in the model here to show the good results possible with NeuroPilot quantization tools.
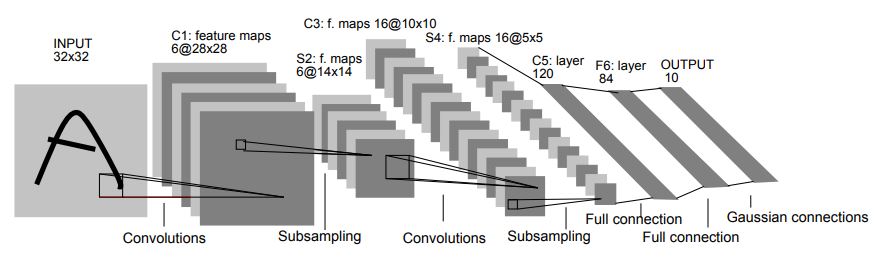
Neural Network LeNet-5 [Lecun et. al. 1998]
This example shows all the steps a developer will use to build and deploy a neural network on an Android device. We will show a variety of model preparation steps, which will illustrate the way NeuroPilot tools are used to prepare neural network models:
- Model Training
- Model Quantization (multiple methods)
- Model TFlite conversion
We also show 2 different deployment options:
- Android Java app using TFlite
- Neuron native compiled binary
6.1.2 Prerequisites
The following packages are required for running the example codes.
- MNIST example code. You can download it from the downloads section of the documentation.
- python == 3.6
- NeuroPilot Quantization tool >= 1.0.0
- NeuroPilot Converter tool >= 1.0.0
- Tensorflow == 1.14
- NeuroPilot Neuron compiler (optional)
- Android Studio
- Android Debug Bridge
6.1.3 Installation Guide
- Install the required NeuroPilot packages by following these guides:
- 2.1.3. Converter Tool Installation Guide
- 2.1.2. Quantization Tool Installation Guide
- 2.1.4. Neuron SDK
- Set project path to the MNIST example directory, named mnist.
export PROJECT_PATH="/absolute_path_to/mnist/"
cd $PROJECT_PATH
export PYTHONPATH=$PYTHONPATH:$PROJECT_PATH
6.1.4 Model Training
This subsection describes the first important step in developing any AI application, within the context of this example. Here, we design a 5-layer convolutional neural network and train it on MNIST dataset. Typically, transfer learning is employed for large complex applications, which begins with an already pretrained model and fine-tunes it on custom dataset. Since this example is a relatively simple one, we can easily train it from scratch on a CPU.
The code snippet showing the 5-layer model architecture is shown below. It can be found in $PROJECT_PATH/utils.py.
defᅠbuild_network(is_training=True):
    """Build the five layer network."""
    image = tf.compat.v1.placeholder(tf.float32, [None, 28, 28, 1], name='image')
    label = tf.compat.v1.placeholder(tf.int32, [None], name='label')

withᅠtf.compat.v1.variable_scope('model', reuse=tf.AUTO_REUSE):
net = tf.layers.Conv2D(24, kernel_size=(7, 7), strides=1, name='conv1', trainable=is_training, use_bias=False)(image)
net = tf.layers.BatchNormalization(fused=True, trainable=is_training)(net)
# Relu6 performs better on quantized networks.
net = tf.nn.relu6(net)

net = tf.layers.Conv2D(48, kernel_size=(5, 5), strides=2, name='conv2', trainable=is_training, use_bias=False)(net)
net = tf.layers.BatchNormalization(fused=True, trainable=is_training)(net)
net = tf.nn.relu6(net)

net = tf.layers.Conv2D(64, kernel_size=(3, 3), strides=2, name='conv3', trainable=is_training, use_bias=False)(net)
net = tf.layers.BatchNormalization(fused=True, trainable=is_training)(net)
net = tf.nn.relu6(net)

net = tf.layers.Flatten()(net)
net = tf.layers.Dense(200, use_bias=True, name='hidden', trainable=is_training)(net)
net = tf.nn.relu6(net)
net = tf.layers.Dense(10, use_bias=False, name='output', trainable=is_training)(net)

returnᅠNetwork(image, label, net)
Now, we train it from scratch on MNIST training dataset for 20 epochs. Users can simply run the provided script for this step as shown below.
cd $PROJECT_PATH/0_train
python3.6 train.py
After training is done, the model checkpoint files are stored inside $PROJECT_PATH/0_train/models. This training script also generates several other outputs:
- A frozen protobuf file. This file captures the Tensorflow GraphDef (pb) data, which is a format used to prepare inference-ready network models.
- A quantization configuration file. This file captures important properties of the neural network, and how the network will be quantized (e.g. bit-width, encoding, tensor names).
During the training and export process, the script also evaluates the model, and shows the accuracy result as below.
Test accuracy 98.5%
6.1.5 Model Quantization
In this section, we will quantize the pretrained floating point model generated above to 8-bit integer format. This is an important procedure required for performing efficient on-device inference. NeuroPilot supports two methods of quantization, namely, post-training quantization and quantization-aware training. These are further described below.
6.1.5.1 Post-Training Quantization
Post-training quantization, also known as direct quantization, takes a pretrained model and quantizes its weights and biases without using a retraining process. NeuroPilot offers a mtk_converter module that performs quantization and conversion in one step. The following code snippet shows an example for its usage and can be found in file $PROJECT_PATH/1_quant/ptq_quant/direct_quant.py.
converter = mtk_converter.TensorFlowV1Converter.from_frozen_graph_def_file(
graph_def_file=os.path.join(env.TRAIN_DIR, 'train.pb'),
input_names=['image'],
input_shapes=[[1,28,28,1]],
output_names=['model/output/MatMul']
)
converter.quantize =ᅠTrue
converter.use_weights_symmetric_quantization=False
converter.use_symmetric_quantization=False
converter.use_per_output_channel_quantization=False
converter.use_unsigned_quantization_type=True
converter.input_value_ranges = [(-1.0, 1.0)]
converter.calibration_data_gen = dataset_generator
out_dir = utils.build_train_dir(env.PTQ_DIR)
out_file = os.path.join(out_dir, 'ptq_quant.tflite')
_ = converter.convert_to_tflite(output_file=out_file)
Run the 8-bit integer direct quantization on the frozen pretrained floating point model. This generates a ptq_quant.tflite model in $PROJECT_PATH/1_quant/ptq_quant/models. Note that this also performs model conversion to TFLite, after quantization.
cd $PROJECT_PATH/1_quant/ptq_quant
mkdir models
python3.6 direct_quant.py
6.1.5.2 Quantization-Aware Training
Quantization-aware training (abbreviated as QAT), also known as retrained quantization, performs quantization and retraining in two distinct phases. It updates the model parameters during the retraining phase in order to minimize the accuracy loss during quantized on-device inference.
6.1.5.2.1 Configuration Generation
To begin the QAT process, we generate a quantization configuration file. In the sample scripts provided for this example, this is done after the training process finishes. Since the configuration file is based on the network generated by the training step. The function used is in the file $PROJECT_PATH/1_quant/qat_quant/gen_config.py.
fromᅠmtk_quantization.tfv1ᅠimportᅠConfigGenerator

q_cfg = ConfigGenerator.from_frozen_graph_def_file(
graph_def_file=os.path.join(env.TRAIN_DIR, 'train.pb'),
input_names=['image'],
input_shapes=[[1, 28, 28, 1]],
output_names=['model/output/MatMul']
)
q_cfg.use_weights_symmetric_quantization =ᅠFalse
q_cfg.use_activations_symmetric_quantization =ᅠFalse
q_cfg.use_per_output_channel_quantization =ᅠFalse
q_cfg.export_config(env.QUANT_CONFIG)
This code produces a JSON-formatted file which contains information about the network that is needed for the QAT process. This step specifies the kind of quantization format desired. In this example, we will use asymmetric per-tensor quantization.
The quantization configuration file can also be generated using a command line tool, mtk_generate_tfv1_quantization_config_file. It is often useful to produce this quantization file immediately after a model is ready, so the Python version can often be more useful.
The output file named quant_config.json is generated in the $PROJECT_PATH directory.
6.1.5.2.2 Retraining
For the retraining step, we perform quantization with retraining for 20 epochs. We start from the trained FP32 model, and apply iterative retraining. This step moves the trainable weights in the network to quantized values, and all the weights are being retrained as a whole. The resulting checkpoint files are stored in $PROJECT_PATH/1_quant/qat_quant/models.
cd $PROJECT_PATH/1_quant/qat_quant
mkdir models
python3.6 retrained_quant.py
The following code snippet shows invocation of the NeuroPilot quantizer, and how it is used with Tensorflow APIs. It can be found in $PROJECT_PATH/1_quant/qat_quant/retrained_quant.py.
quantize_handler = mtk_quantization.tfv1.QuantizeHandler()
output, = quantize_handler.prepare(is_training=True,
quant_config_file=env.QUANT_CONFIG,
tensors_to_update=[network.output])
The script will generate a quantized protobuf model (.pb) in the output directory $PROJECT_PATH/1_quant/qat_quant/models.
6.1.5.2.3 Converting to TFlite
After the training process is done, the last step before a model can be run is to convert it to the TFlite formt (.tflite file). A Python script in file $PROJECT_PATH/1_quant/qat_quant/convert.py is provided. This script reads in a frozen protobuf file, and produces a .tflite file ready for deployment. The relevant code snippet is here:
converter = mtk_converter.TensorFlowV1Converter.from_frozen_graph_def_file(
graph_def_file=os.path.join(env.QAT_DIR, 'qat_quant.pb',
input_names=['image'],
input_shapes=[[1,28,28,1]],
# The output tensor name changes when the Quantization nodes are added.
# You can find the output tensor by inspecting the .pb file.
output_names=['model/output/MatMul/act_quant/FakeQuantWithMinMaxVars']
)
converter.quantize =ᅠTrue
converter.use_weights_symmetric_quantization=False
converter.use_symmetric_quantization=False
converter.input_value_ranges = [(-1.0, 1.0)]
outfile = os.path.join(env.QAT_DIR, 'qat_quant.tflite')
converter.convert_to_tflite(output_file=outfile)
This generates a qat_quant.tflite model in $PROJECT_PATH/1_quant/qat_quant/models
6.1.6 Model Deployment
In this section, we will deploy a previously generated TFLite model (qat_quant.tflite) on a device using two different flows. First, we demonstrate an Android Java application that uses the TFLite model and performs real-time hand-written digit recognition on an Android device. Next, we use NeuroPilot’s Neuron package to compile the TFLite model into a dla binary and run it on a MediaTek device.
6.1.6.1 Android Application
The codes for this section are located within $PROJECT_PATH/3_deploy/android. This section requires Android Studio with NDK support installed. Please refer to the section on 2.1.1. Setting Up Android Studio for more details. The steps required to build the Android applicaiton are mentioned below.
- Launch Android Studio.
- Open the folder android.
- Accept any Android Studio suggestions to upgrade build system components if offered.
- Make Project to initiate Gradle Build by either selecting Build > Make Project.
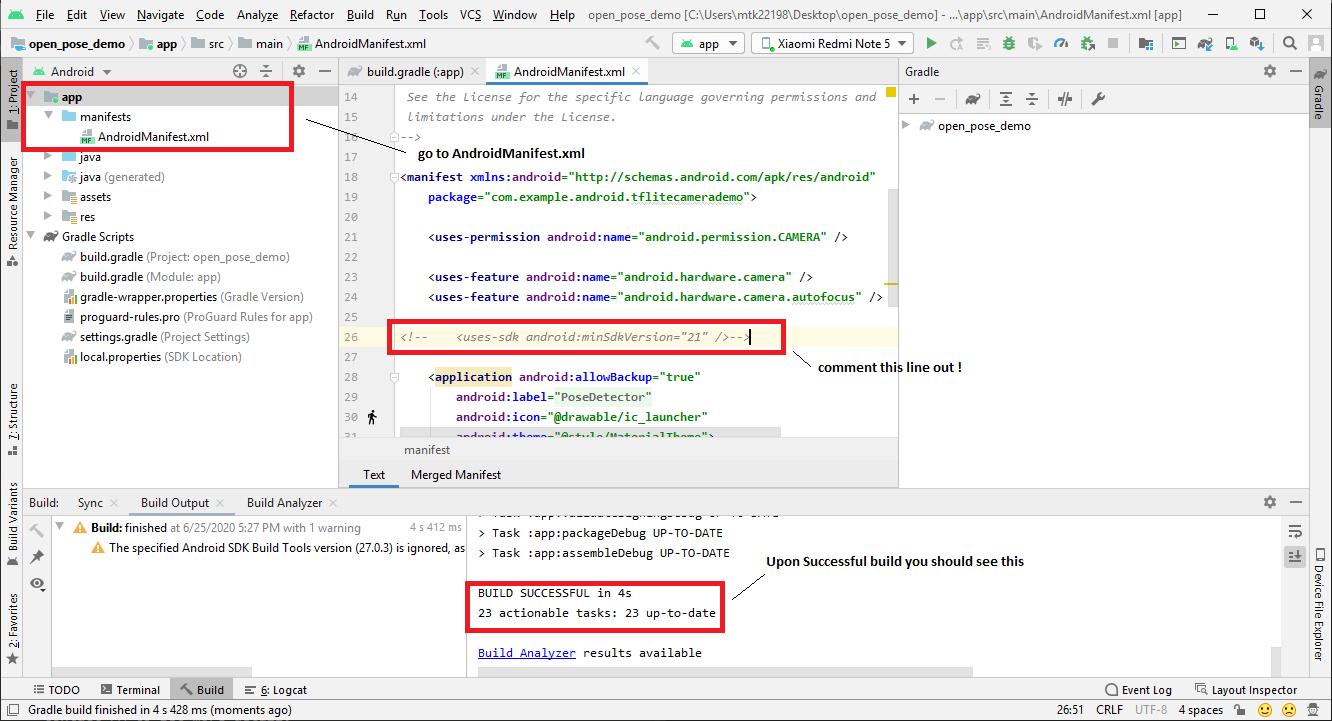
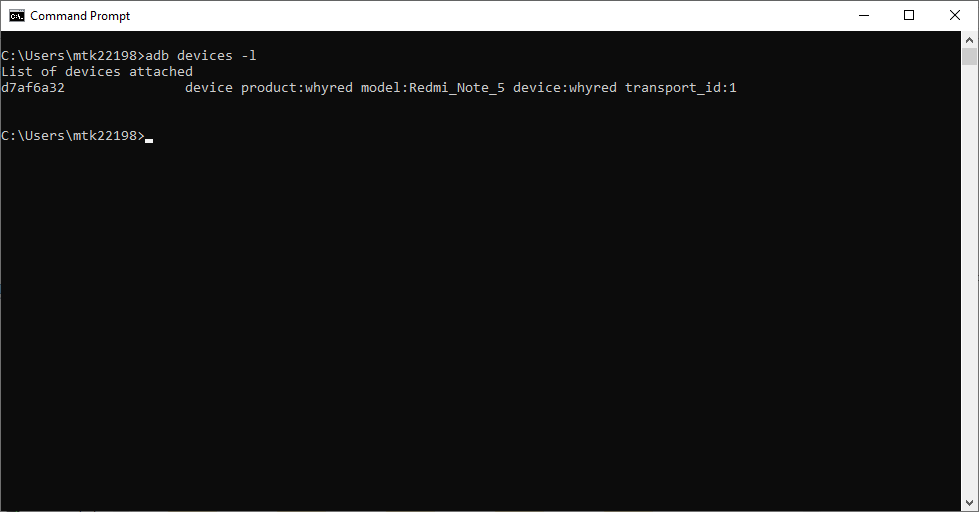
- Check if your device is Properly connected. On a terminal run the command adb devices -l. The output should look like this.
- Run the app by either selecting Run > Run ‘app’.
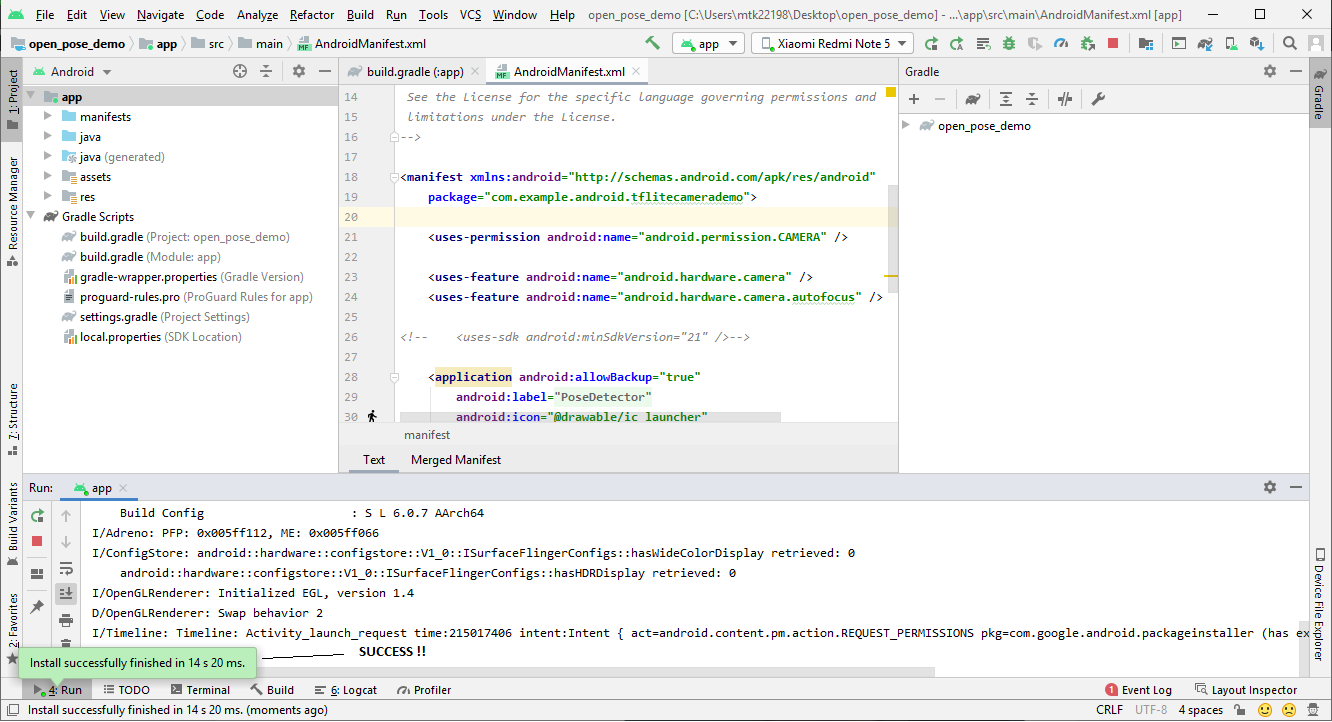
- On your device, you may need to allow permissions to install via Android Debug Bridge and keep the device unlocked. Upon Successful completion, you should see the app on your device. When the demo is run, it will appear like below.

6.1.6.2 Neuron Compiler and Runtime
Neuron SDK, offered as part of NeuroPilot, consists of a compiler and runtime and is designed to generate extremely efficient model binaries that are specifically optimized for MediaTek platforms. The codes for this section are located within $PROJECT_PATH/3_deploy/neuron. The steps for using Neuron SDK to compile and run a previously generated TFLite model (qat_quant.tflite) are provided below.
- Convert input image to binary format. There are a few sample MNIST images in the $PROJECT_PATH/3_deploy/neuron/input. Users can run the provided script as shown below. This will generate 0.png_2828.bin inside $PROJECT_PATH/3_deploy/neuron/input. Please refer to $PROJECT_PATH/3_deploy/neuron/gen_bin_input.py for more details on the usage.
cd $PROJECT_PATH/3_deploy/neuron
python3.6 gen_bin_input.py input/0.png 28 28
- Push neuron tools (compiler and runtime) to the device via ADB. Make sure the device is connected by running adb devices.
adb push $PROJECT_PATH/3_deploy/neuron/build/. /data/local/tmp
adb push $PROJECT_PATH/3_deploy/neuron/target/lib /data/local/tmp
adb push $PROJECT_PATH/3_deploy/neuron/target/bin/. /data/local/tmp
- Push TFLite model and input to the device.
adb push $PROJECT_PATH/3_deploy/neuron/model /data/local/tmp
adb push $PROJECT_PATH/3_deploy/neuron/input /data/local/tmp
- Provide executable permissions to the neuron tools.
adb shell chmod +x /data/local/tmp/compiler
adb shell chmod +x /data/local/tmp/runtime
adb shell chmod +x /data/local/tmp/ncc-tflite
adb shell chmod +x /data/local/tmp/neuronrt
- Compile the TFLite model into MediaTek proprietary dla binary format using Neuron Compiler. This will generate a binary file named qat_quant.dla in data/local/tmp/model on the device.
adb shell "export LD_LIBRARY_PATH=/data/local/tmp/lib
adb shell "./data/local/tmp/ncc-tflite -arch mdla1.5 -v -i /data/local/tmp/input/0.png_2828.bin -o qat_quant.dla /data/local/tmp/model/qat_quant.tflite"
- Execute the .dla binary on the device using Neuron Runtime.
adb shell "./data/local/tmp/neuronrt -m hw -a /data/local/tmp/model/qat_quant.dla -i /data/local/tmp/input/0.png_2828.bin -o output.bin -c 100"
6.2 MobileNetV2 Example
In this section, we provide a detailed step-by-step walkthrough to optimize and deploy the MobileNetV2 model, pre-trained on the CIFAR-10 or the ImageNet dataset. This section is organized as follows. First, we outline the prerequisite package requirements and installation guidelines. Next, we describe the steps for model quantization. Finally, we detail the API to convert the pre-trained and optimized model into TF Lite format and deploy it on a MediaTek mobile SoC.
6.2.1 Prerequisites
The following packages and MediaTek hardware platform are required for running the example codes.
- MobileNetV2 Example code. You can download it from the downloads section of the documentation.
- python == 3.6
- NeuroPilot Quantization tool >= 1.0.0
- NeuroPilot Converter tool >= 1.0.0
- tensorflow == 1.14
- tensorflow_datasets == 1.3.2
- Android Debug Bridge
6.2.2 Installation Guide
- Install the required NeuroPilot packages by following these guides:
- 2.1.3. Converter Tool Installation Guide
- 2.1.2. Quantization Tool Installation Guide
- 2.1.4. Neuron SDK
- Install prerequisite packages.
pip3.6 install -r requirements.txt --find-link=$EXAMPLES_ROOT/package
- Set project path to the MobileNetV2 example directory, named mobilenet_v2.
export PROJECT_PATH="/absolute_path_to/mobilenet_v2/"
cd $PROJECT_PATH
export PYTHONPATH=$PYTHONPATH:$PROJECT_PATH
6.2.3 Dataset Preparation
In this example, we use CIFAR10 to train, optimize, and evaluate the MobileNetV2 model. The CIFAR10 dataset can be obtained via the tensorflow_datasets package, and hence, need not be downloaded manually. On the other hand, users, who want to train and optimize the network on ImageNet, should download the source images from the official website. We only provide the list of training and validation data in $PROJECT_PATH/data/imagenet.
6.2.4 Model Preparation
Users can either download the publicly available MobileNetV2 floating-point model, pre-trained on ImageNet, or train MobileNetV2 from scratch as shown below.
|
Important: |
|
Please ensure that the train section in config_cifar10.yml is configured properly before executing the training script. |
6.2.4.1 YAML Configuration for Model Training
The train section in YAML configuration, which contains the supported configuration options for model training, is described below.
train:
general:
random_seed: The random seed for TensorFlow.
epoch: Number of training epochs.

dataset:
name: Name of the dataset.

training:
batch_size: Number of images to be sent into the network every training step.
split: A string 'train' or 'test', which specifies whether training set or test set
is used for training.

validation:
split: A string 'train' or 'test', which specifies whether training set or test set
is used for validation.

model:
dropout_rate: The probability with which activations are dropped in the dropout layer.
weight_decay: The weighting factor for L2 regularization loss.

learning_rate:
init_learning_rate: Initial learning rate.
warmup_learning_rate: Target learning rate for the warming up procedure.
warmup_steps: Number of steps to linearly increase learning rate from `init_learning_rate`
to `warmup_learning_rate`.
total_steps: Number of steps to decay learning rate from `warmup_learning_rate` to 0 by
`tf.compat.v1.train.cosine_decay`.

optimizer:
momentum: The momentum rate used by `tf.compat.v1.train.MomentumOptimizer`.

logging:
ckpt_path: Path for the directory used to save or restore model checkpoints.
log_steps: Frequency (in steps) for logging model info.
save_steps: Frequency (in steps) for saving the model checkpoint.
A sample YAML configuration file, config_cifar10.yml, with default initialization for the various train options, is provided below.
train:
general:
random_seed: 1234
epoch: 100

dataset:
name: 'cifar10'
training:
split: 'train'
batch_size: 100
validation:
split: 'test'

model:
dropout_rate: 0.5
weight_decay: 0.0005

learning_rate:
init_learning_rate: 0.0001
warmup_learning_rate: 0.1
warmup_steps: 2500
total_steps: 100000

optimizer:
momentum: 0.9

logging:
ckpt_path: '{PROJECT_PATH}/snapshot/cifar10/float'
log_steps: 100
save_steps: 500
|
See also: |
|
A similar configuration for training on ImageNet data can be found in config_imagenet.yml. |
The training step can be executed via the provided scripts by issuing the following command.
python3.6 run.py --config=config_cifar10.yml --process=train
6.2.4.2 Verification
You can verify the performance of the trained model by running the post-training evaluation code.
python3.6 run.py --config=config_cifar10.yml --process=eval
6.2.4.3 Trained Model Freeze
Other processing steps will need to read the trained model in GraphDef format (.pb). We will create this file now that the training step is complete. This GraphDef is created from the most recent model checkpoint saved in the training directory.
python3.6 tool/export_pb.py --dataset=cifar10ᅠ\
--ckpt_path=${PROJECT_PATH}/snapshot/cifar10/floatᅠ\
--export_pb_name=train.pb
6.2.5 Model Quantization
NeuroPilot provides two different methods for quantizing a pre-trained floating-point model, namely, post-training quantization and quantization-aware training. In this section, we first describe the steps for carrying out post-training quantization followed by that for quantization-aware training.
6.2.5.1 Post-training Quantization
Post-training quantization can be done with the following code. Since the post-training quantization is done during model conversion, user could set any desired quantization settings via the converter properties.
python3.6 run.py --config=config_cifar10.yml --process=ptq_quant
After the conversion function completes, a .tflite function is produced, and can be used by a user application.
6.2.5.2 Quantization-aware Training
First, we generate the quantization configuration file for quantization-aware training. This can be done using the following scripts:
mtk_generate_tfv1_quantization_config_fileᅠ\
--input_frozen_graph_def_file=${PROJECT_PATH}/snapshot/cifar10/float/train.pbᅠ\
--input_names=MobileNetV2/Inputᅠ\
--output_names=MobileNetV2/Predictionᅠ\
--input_shapes=1,32,32,3ᅠ\
--use_per_output_channel_quantization=Falseᅠ\
--use_weights_symmetric_quantization=Falseᅠ\
--output_file=${PROJECT_PATH}/snapshot/cifar10/float/quant_config.json
After that, we can start the quantization-aware training process based on the YAML configuration.
python3.6 run.py --config=config_cifar10.yml --process=qat_quant
The key supported options for quantization-aware training (qat_quant) field, in the YAML configuration, are described below.
qat_quant:
...
logging:
ckpt_path: Path for the directory to store the quantized model checkpoints.
pretrained_ckpt: Path for the pre-trained floating-point model checkpoint.
pretrained_scope: The scope for all the pre-trained variables in the model.
...

quant:
quant_config: Path for the `.json` file which contains the quantization config.,
generated by running the `$NEUROPILOT_PATH/bin/fakequant_marker` tool (step 3).

A sample YAML configuration file, config_cifar10.yml, with default initialization for select qat_quant options, is provided below.

qat_quant:
...
logging:
ckpt_path: '{PROJECT_PATH}/snapshot/cifar10/quant/qat_quant'
pretrained_ckpt: '{PROJECT_PATH}/snapshot/cifar10/float/'
pretrained_scope: 'MobileNetV2'
...

quant:
quant_config: '{PROJECT_PATH}/snapshot/cifar10/float/quant.json'
After the training process is done, we can verify the results of the quantization step and export the fake-quantized model to a GraphDef file for later use.
python3.6 run.py --config=config_cifar10.yml --process=qat_eval

python3.6 tool/export_pb.pyᅠ\
--ckpt_pathᅠ${PROJECT_PATH}/snapshot/cifar10/quant/qat_quant/ᅠ\
--quant_configᅠ${PROJECT_PATH}/snapshot/cifar10/float/quant_config.jsonᅠ\
--export_pb_name qat_quant.pbᅠ\
--is_quant --dataset cifar10
6.2.6 Model Conversion to TensorFlow Lite
In this section, we provide some examples to convert a floating-point or fake-quantized TensorFlow model (in .pb format) to TF Lite, using the NeuroPilot converter tool. Before proceeding to model conversion, we need to export the corresponding checkpoint file (generated from any of the quantization flow above) to .pb format using $PROJECT_PATH/tool/export_pb.py.
Command to convert float pb model to float TF Lite
mtk_tensorflow_v1_converterᅠ\
--input_frozen_graph_def_file=$PROJECT_PATH/snapshot/cifar10/float/train.pbᅠ\
--output_file=$PROJECT_PATH/snapshot/cifar10/float/mobilenet_v2_fp.tfliteᅠ\
--input_names=MobileNetV2/Inputᅠ\
--input_shapes=1,32,32,3ᅠ\
--output_names=MobileNetV2/Predictionᅠ\
--input_value_ranges=-1,1
Command to convert pruned pb model to float TF Lite
mtk_tensorflow_v1_converterᅠ\
--input_frozen_graph_def_file=$PROJECT_PATH/snapshot/cifar10/prune/iterative/prune_iter.pbᅠ\
--output_file=$PROJECT_PATH/snapshot/cifar10/prune/iterative/mobilenet_v2_prune.tfliteᅠ\
--input_names=MobileNetV2/Inputᅠ\
--input_shapes=1,32,32,3ᅠ\
--output_names=MobileNetV2/Predictionᅠ\
--input_value_ranges=-1,1
Command to convert fake-quantized pb model to uint8 TF Lite
mtk_tensorflow_v1_converterᅠ\
--input_frozen_graph_def_file=$PROJECT_PATH/snapshot/cifar10/quant/qat_quant/qat_quant.pbᅠ\
--output_file=$PROJECT_PATH/snapshot/cifar10/quant/qat_quant/mobilenet_v2_qat.tfliteᅠ\
--input_names=MobileNetV2/Inputᅠ\
--input_shapes=1,32,32,3ᅠ\
--output_names=MobileNetV2/Predictionᅠ\
--use_unsigned_quantization_type=Trueᅠ\
--use_weights_symmetric_quantization=Falseᅠ\
--input_value_ranges=-1,1ᅠ\
--quantize=True
6.2.7 TensorFlow Lite Model Deployment
This section walks through the steps for deploying a TFLite model onto an Android device via Android Debug Bridge (ADB). Make sure you have ADB installed to begin with.
- Download Android NDK toolchain and CMake packages.
mkdir $PROJECT_PATH/on_device/tool
cd $PROJECT_PATH/on_device/tool
wget https://dl.google.com/android/repository/android-ndk-r20-linux-x86_64.zip
unzip android-ndk-r20-linux-x86_64.zip
wget https://cmake.org/files/v3.6/cmake-3.6.0-Linux-x86_64.tar.gz
tar zxvf cmake-3.6.0-Linux-x86_64.tar.gz
- Build inference code and generate executable.
mkdir $PROJECT_PATH/on_device/build
cd $PROJECT_PATH/on_device/build
$PROJECT_PATH/on_device/tool/cmake-3.6.0-Linux-x86_64/bin/cmake -DTARGET=aarch64 ../
make
Please check that output executable, GenericClassifier, is in build folder.
- Generate binary data.
PYTHONPATH=PYTHONPATH:${PROJECT_PATH}ᅠpython3.6 tool/gen_bin.py --dataset cifar10 --output_dir data/cifar10/bin
- Push models, data and executable onto the device via ADB. Make sure the device is connected to the host machine by running adb devices.
# push executable to device
adb push $PROJECT_PATH/on_device/build/GenericClassifer /data/local/tmp
adb shell chmod +x /data/local/tmp/GenericClassifier

# push dataset to device
adb pushᅠ${PROJECT_PATH}/data/cifar10/bin/preprocessed/ /data/local/tmp/preprocessed/
adb pushᅠ${PROJECT_PATH}/data/cifar10/bin/preprocessed.txt /data/local/tmp

# push models to device
adb pushᅠ${PROJECT_PATH}/snapshot/cifar10/float/mobilenet_v2_fp.tflite /data/local/tmp/cifar10_float.tflite
adb pushᅠ${PROJECT_PATH}/snapshot/cifar10/prune/iterative/mobilenet_v2_prune.tflite /data/local/tmp/cifar10_iterative_prune_float.tflite
adb pushᅠ${PROJECT_PATH}/snapshot/cifar10/quant/ptq_quant/mobilenet_v2_ptq.tflite /data/local/tmp/cifar10_ptq_quant_uint8.tflite
- Calculate accuracy on device.
# usage
adb shell /data/local/tmp/GenericClassifier -a 1 -m [TFLITE_MODEL] -d [DATASET_DIRECTORY] -l [LABEL_FILE]

# run float model
adb shell /data/local/tmp/GenericClassifier -a 1 -m /data/local/tmp/cifar10_float.tflite -d /data/local/tmp/preprocessed/ -l /data/local/tmp/preprocessed.txt

# run one-shot pruned model
adb shell /data/local/tmp/GenericClassifier -a 1 -m /data/local/tmp/cifar10_iterative_prune_float.tflite -d /data/local/tmp/preprocessed/ -l /data/local/tmp/preprocessed.txt

# run quantized model
adb shell /data/local/tmp/GenericClassifier -a 1 -m /data/local/tmp/cifar10_ptq_quant_uint8.tflite -d /data/local/tmp/preprocessed/ -l /data/local/tmp/preprocessed.txt

# run pruned quantized model
adb shell /data/local/tmp/GenericClassifier -a 1 -m /data/local/tmp/cifar10_pruned_qat_quant_uint8.tflite -d /data/local/tmp/preprocessed/ -l /data/local/tmp/preprocessed.txt

# for example, you will see the logs in the console as following
# the logs contain
# (1) the name and label of each file which is processing
# (2) the predicted class of each file which is processing
# (3) the accuracy of the files in the input directory
[INFO][GenericClassifierApp]: processing preprocessed_5688.bin, label: 5
[INFO][GenericClassifierApp]: Predicted class: 5
[INFO][GenericClassifierApp]: processing preprocessed_4958.bin, label: 8
[INFO][GenericClassifierApp]: Predicted class: 8
...
[INFO][GenericClassifierApp]: processing preprocessed_444.bin, label: 3
[INFO][GenericClassifierApp]: Predicted class: 3
[INFO][GenericClassifierApp]: processing preprocessed_1393.bin, label: 1
[INFO][GenericClassifierApp]: Predicted class: 1
[INFO][GenericClassifierApp]: processing preprocessed_6511.bin, label: 3
[INFO][GenericClassifierApp]: Predicted class: 3
[INFO][GenericClassifierApp]: Accuracy [9141/10000]: 0.914100
- Estimate inference time on device.
# usage
adb shell /data/local/tmp/GenericClassifier -a 0 -m [TFLITE_MODEL] -i [INPUT_BINARAY] -o [OUTPUT_BINARY]

# run float model
adb shell /data/local/tmp/GenericClassifier -a 0 -m /data/local/tmp/cifar10_float.tflite -i /data/local/tmp/preprocessed/preprocessed_0.bin -o /data/local/tmp/output_cifar10_float.bin -c 30

# run one-shot pruned model
adb shell /data/local/tmp/GenericClassifier -a 0 -m /data/local/tmp/cifar10_iterative_prune_float.tflite -i /data/local/tmp/preprocessed/preprocessed_0.bin -o /data/local/tmp/output_cifar10_iterative_prune_float.bin -c 30

# run quantized model
adb shell /data/local/tmp/GenericClassifier -a 0 -m /data/local/tmp/cifar10_ptq_quant_uint8.tflite -i /data/local/tmp/preprocessed/preprocessed_0.bin -o /data/local/tmp/output_cifar10_ptq_quant_uint8.bin -c 30

# for example, you will see the logs in the console as following
# the logs contain
# (1) input and output tensor size
# (2) the predicted probability of each class
# (3) the inference time (duration in invoke)
# (4) the predicted class
INFO: Initialized TensorFlow Lite runtime.
INFO: Initialized MTK TensorFlow Lite runtime.
INFO: Created MTK TFLite delegate QᅠforᅠNNAPI.
[INFO][GenericClassifier]: Input tensor byte size: 3072
[INFO][GenericClassifier]: Output tensor byte size: 10
[INFO][GenericClassifier]: Probility[0] = 0.000
[INFO][GenericClassifier]: Probility[1] = 0.000
[INFO][GenericClassifier]: Probility[2] = 0.996
[INFO][GenericClassifier]: Probility[3] = 0.000
[INFO][GenericClassifier]: Probility[4] = 0.000
[INFO][GenericClassifier]: Probility[5] = 0.000
[INFO][GenericClassifier]: Probility[6] = 0.000
[INFO][GenericClassifier]: Probility[7] = 0.000
[INFO][GenericClassifier]: Probility[8] = 0.000
[INFO][GenericClassifier]: Probility[9] = 0.000
[INFO][GenericClassifier]: Averaged Latencyᅠinᅠ30 inference: 25.92 ms
[INFO][GenericClassifierApp]: Predicted class: 2
The arguments for the executable tool GenericClassifier are further described below.
- –input, -i * A string path to the input bin file.
- –output, -o * A string path to the output bin file.
- –tflite_model, -m * A string path to the TFLite model file.
- –accuracy, -a * An integer indicates whether to calculate accuracy among files in the –input_dir. Default set to 0. Set to 1 to calculate accuracy among files in the –input_dir.
- –input_dir, -d * A string path to the files of input directory. Only available when –accuracy is set to 1. The folder structure is as below:
INPUT_DIR/
0001.bin
0002.bin
0003.bin
- –label_file, -l * A string path to the input label file. Only available when –accuracy is set to 1. A txt file that lists the names of input bin files and the labels. The content of the file is as below:
0001.bin 3
0002.bin 2
0003.bin 9
- –model_info, -p * An integer indicates whether to print the TFLite model information. Default set to 0. Set to 1 to print the model information.
- –enable_softmax, -s * An integer indicates whether to apply softmax on the inference result. Default set to 0. Set to 1 to apply softmax on the inference result.
- –loop_count, -c * An integer to set the number of inference times. Default set to 1.
This documentation provides a detailed description of Mediatek’s NeuroPilot software tool suite. This section begins by outlining the subjects covered in the documentation, and then proceeds on to provide an introduction to the various tools, terminology, and goals of the NeuroPilot software.
|
Note: |
|


